User Accounts
Overview
The user-account section within SEB Server can be used to create new or modify user-accounts for other user or to modify the own user account and changing the password. This section differs most for the different roles in SEB Server.
Note
If a quick use-case based reference suites you better, just forward to the “Use Cases” section of this chapter below
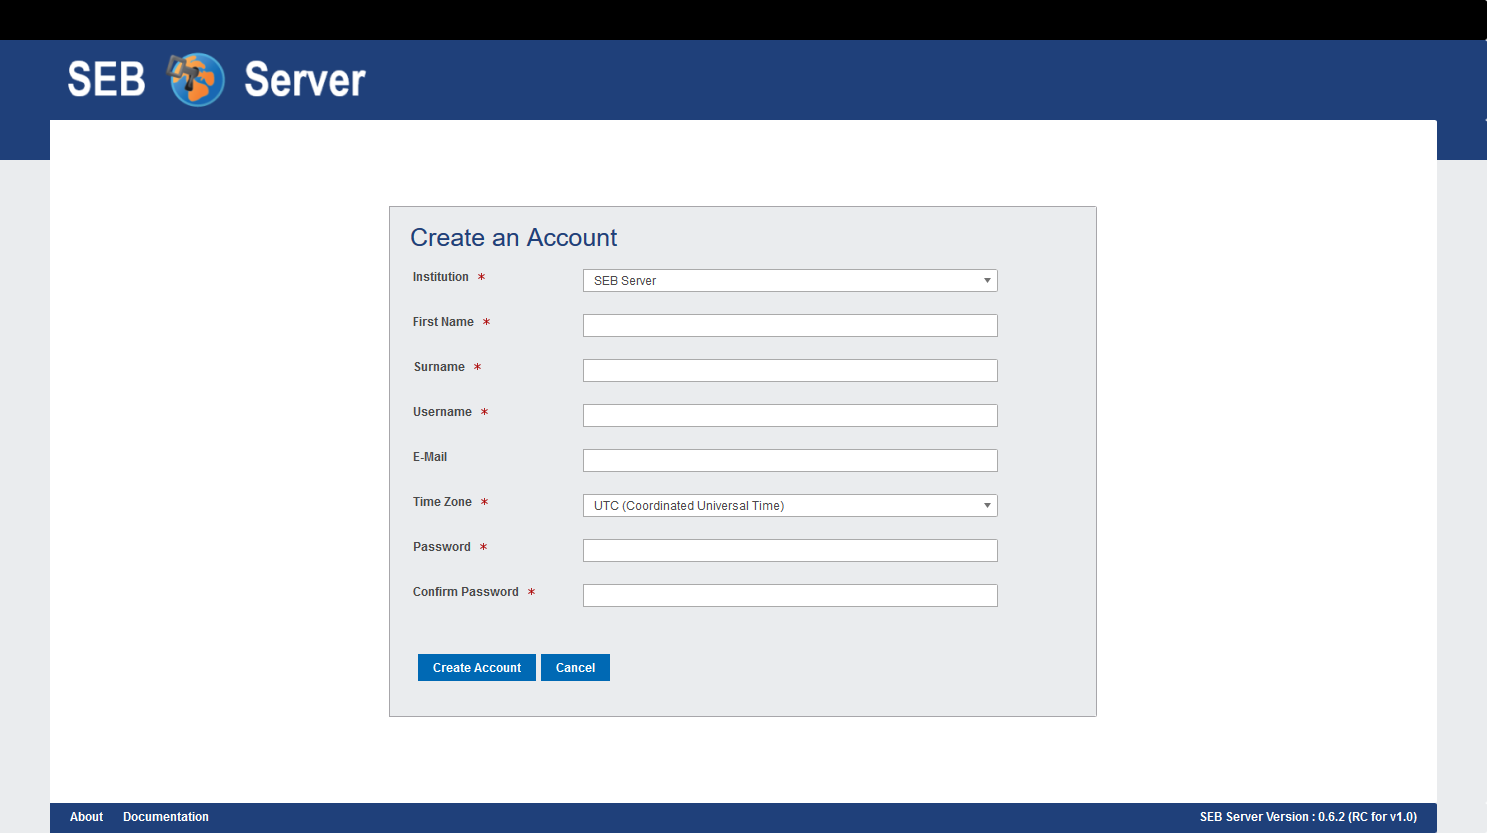
A user account always belongs to one institution and has some basic attributes;
Institution: A combo- or single-selection to choose the institution the user account belongs to. This is mandatory and one user-account can only belong to one institution.
First Name: The first name of the user
Surname: The surname of the user
Username: The username within SEB Server. This name is used to login.
E-Mail: The E-Mail address for the user. This currently has only informational purpose and is neither used to confirm an account or to send automated mails.
Time Zone: The time zone the user belongs to and to which the dates and times are converted to for display it to the user in the GUI. See also the note about time zone below.
User Roles: A multi-selection input to define all roles a user account has. See also the note about roles below.
Password: This password input field appears only while creating a new user-account or while self-register a user-account.
Confirm Password: This password input field appears only while creating a new user-account or while self-register a user-account.
Note
The date and time values within the SEB Server are always stored in universal time (UTC) and converted from and to the time zone a user account has defined. The time zone of the user account is usually labeled and the UTC time is shown below if possible.
Note
The role selection is only displayed for user-accounts that has user-account modification privileges like SEB Server administrator and institutional administrator. Roles can be combined by selecting more then one role. For more information about roles and each role see the section Roles and Use-Cases
By selecting the “User Account” section on the left side menu, a SEB Server administrator will see a list of all user-accounts of all institution within a SEB Server instance. The filter above the list can be used to search a certain user account. Use the:
Institution filter to select a certain institution and show only the user-accounts that belongs to this institution.
First Name filter to search for user-accounts with the given occurrence of text in the First Name.
Surname filter to search for user-accounts with the given occurrence of text in the Surname.
User Name filter to search for user-accounts with the given occurrence of text in the Username.
Mail filter to find an user-account by e-mail address
Status filter to select the either and see either only active, only inactive or all user-accounts
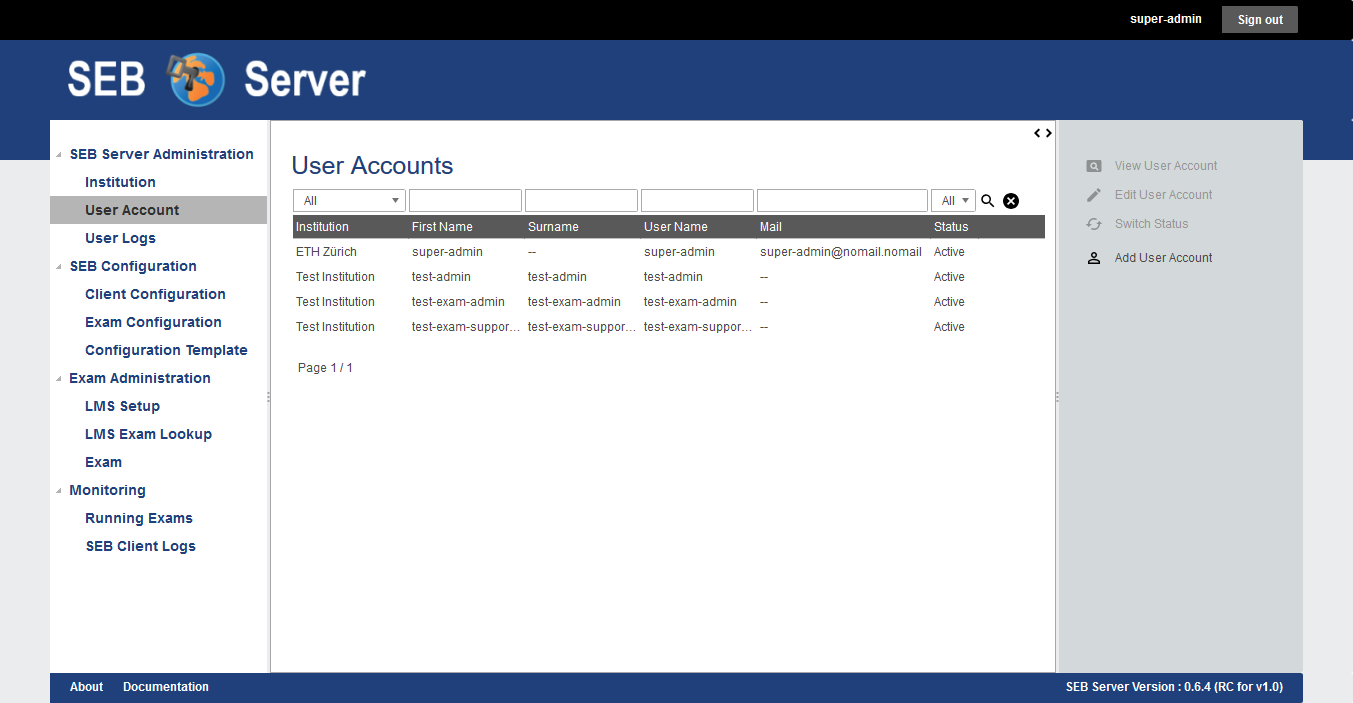
To view all information of a user-account, double-click in a certain user-account entry from the list or select an entry from the list and use the “View User Account” action on the right action pane. The user account form will be shown in read only mode with all account information. To edit this user-account use the “Edit User Account” action on the right action pane. To change the password of the user
Use Cases
Register as an exam supporter
Registering as a new user is possible only within the SEB Server form-registration yet. Since the SEB Server is mainly a service for administrative work, there is no third party registration and login in place so far. A self-registered user-account has the single role of an Exam Supporter and since this user-account is not applied to an existing exam and running, the user is only able to see and edit its own account settings. Another user with Exam Administrator role can then assign the new user-account to an exam for support and monitoring. Or one other user-account with Institution Administrator role can edit the new user-account and give it more privileges.
To register a new user-account follow the steps below
Use a Web-Browser and go to the SEB Server login page by entering the SEB Server URL.
Click the “Register” action on the login page that is shown right after the “Sign In” action.
The application will show the registration form. See the image below.
Enter all mandatory account data within the form and use the “Register” action to confirm.
If there is missing or wrong data, the registration form will highlight the concerned input fields with a red border and information text just below the field.
If everything is accepted the user-account is created and the application forwards automatically to the login page.
Sign in with the user credentials to check the account works correctly.
Once signed in, the user can see all sections for an Exam Administrator as shown in the image below. Because the user is not assigned to any Exam as a supporter yet, the “Exam Administration” and “Monitoring” sections are empty. The user is only able to change the account settings.

Create new user-account
As a user with user-account write privileges (SEB Server administrator and institutional administrator) one can create new user-account for others. This must usually be done if a particular user is not able to register itself for whatever reason or if internal policies prefer this kind of registration. A user with user-account write privileges you can create a new user-account as follows;
Login to SEB Server application with your own account and click the “User Account” section on the left side menu.
Use the “Add User Account” action from the action pane on the right hand-side to create a new user-account.
Enter all mandatory account data within the form and use the “Register” action to confirm.
If there is missing or wrong data, the registration form will highlight the concerned input fields with a red border and information text just below the field.
If everything is accepted the user-account is created and the application shows the user-account form in view mode.
Now the administrator can give the created user credentials directly to the user with the advice to immediately change the password.
Modify user-account
As a user with user-account write privileges (SEB Server administrator and institutional administrator) one can modify user-accounts of others while all other users can only modify its own account settings.
Login to SEB Server application with your own account and click the “User Account” section on the left side menu.
As a user with user-account write privileges one will see the list of all available user-accounts. Find the user-account that must be modified by using the filter above and double-click on the respective list entry to open the user-account form in view mode
Without user-account write privileges, a user will just see its own user-account form in view mode.
Use the “Edit User Account” action from the action pane on the right to change to edit mode. Apply all needed modifications and save the user-account by using the “Save User Account” action from the action pane.
If there is missing or wrong data, the registration form will highlight the concerned input fields with a red border and information text just below the field.
If everything is accepted the user-account is created and the application shows the user-account form in view mode.
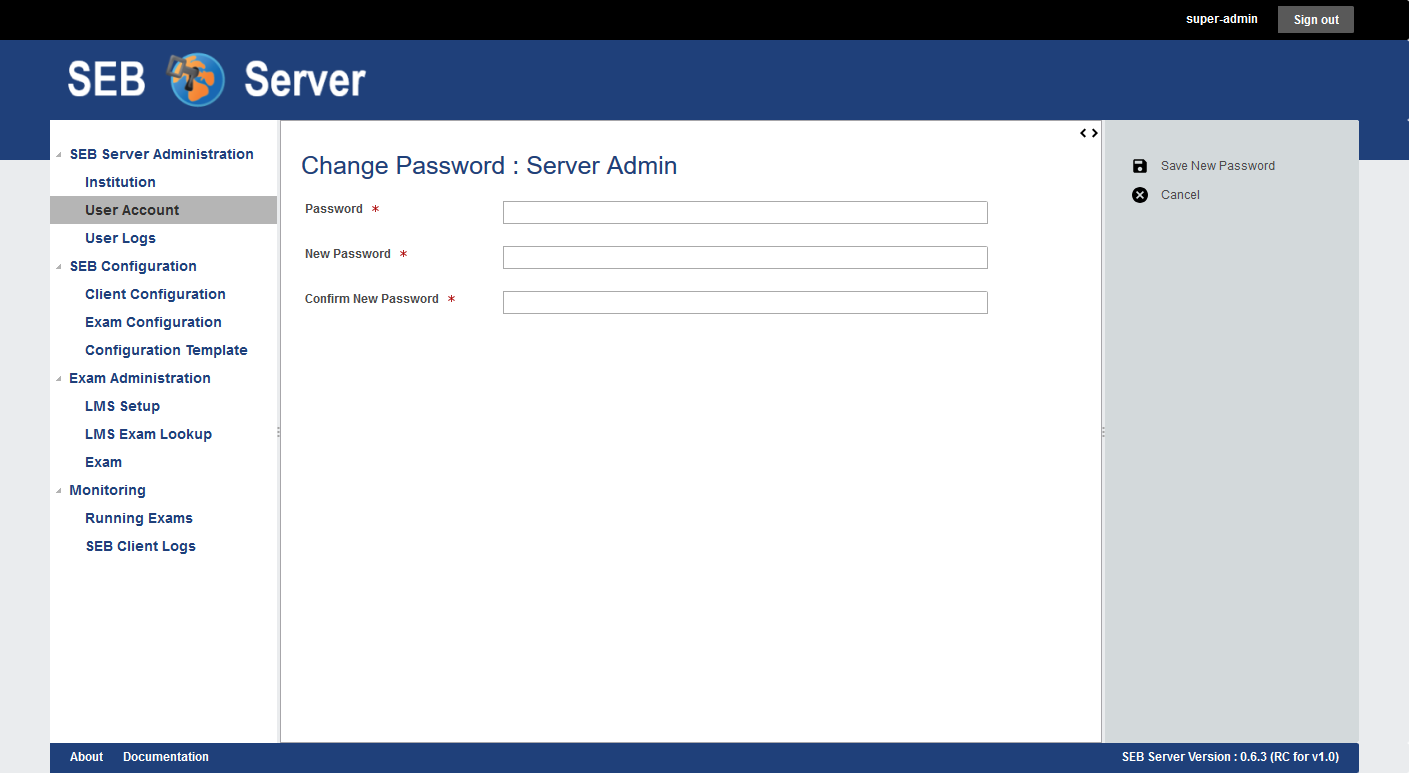
Change password
As a user with user-account write privileges (SEB Server administrator and institutional administrator) one can change the password also for others while all other users can only modify change its own password. The current password must be known to change the password.
Login to SEB Server application with your own account and click the “User Account” section on the left side menu.
As a user with user-account write privileges will see the list of all available user-accounts. Find the user-account that must be modified by using the filter above and double-click on the respective list entry to open the user-account form in view mode
Without user-account write privileges, a user will just see its own user-account form in view mode.
Use the “Change Password” action on the right action pane to open the change password form.
No you must first give the correct old password and the new password then with confirmation.
Use the “Save New Password action form the right action pane to save the new password settings.
If you are changing your own password and everything is correct, the application will automatically log you out and prompt you to sign in with the new password.
If you are changing the password of another user-account the application and everything is correct, the application direct you back to the user-account form in view mode and show a confirmation message.
Activate / Deactivate user-account
Users with user-account write privileges (SEB Server administrator and institutional administrator) are able to activate/deactivate user-accounts of others. A inactive user-account prevent a user to sign-in. There are several different ways or places where the status of a user-account can be changed
On the list view while one list entry is selected, by using the “Activate User Account” or “Deactivate User Account” action from the action pane at the right side. There will be automatically appear the proper action in relation to the selected list entry and whether it is already active or inactive.
In the user-account form in view mode by using the “Activate User Account” or “Deactivate User Account” action from the action pane at the right side. There will be automatically appear the proper action in relation to the current user-account.
If one creates a new user-account there is the possibility to create and activate the user-account by using the “Activate User Account” action from the action pane on the right side.
The same situation appears for inactive user-accounts in edit mode.
Delete a user-account
Users with user-account write privileges (SEB Server administrator and institutional administrator) are able to delete user-accounts of others.
Note
Please be aware that deletion means full deletion form the persistent storage, all data will be lost.
A user account can be deleted with all dependencies that belongs to the user-account. This includes:
All exam configuration the user has created and is owner of
All exams the user has created and is owner of and all dependencies of an exam to like indicators, configuration mappings and all monitoring data if present
Login to SEB Server application with your own account and click the “User Account” section on the left side menu.
As a user with user-account write privileges will see the list of all available user-accounts. Find the user-account that must be deleted by using the filter above and double-click on the respective list entry to open the user-account form in view mode.
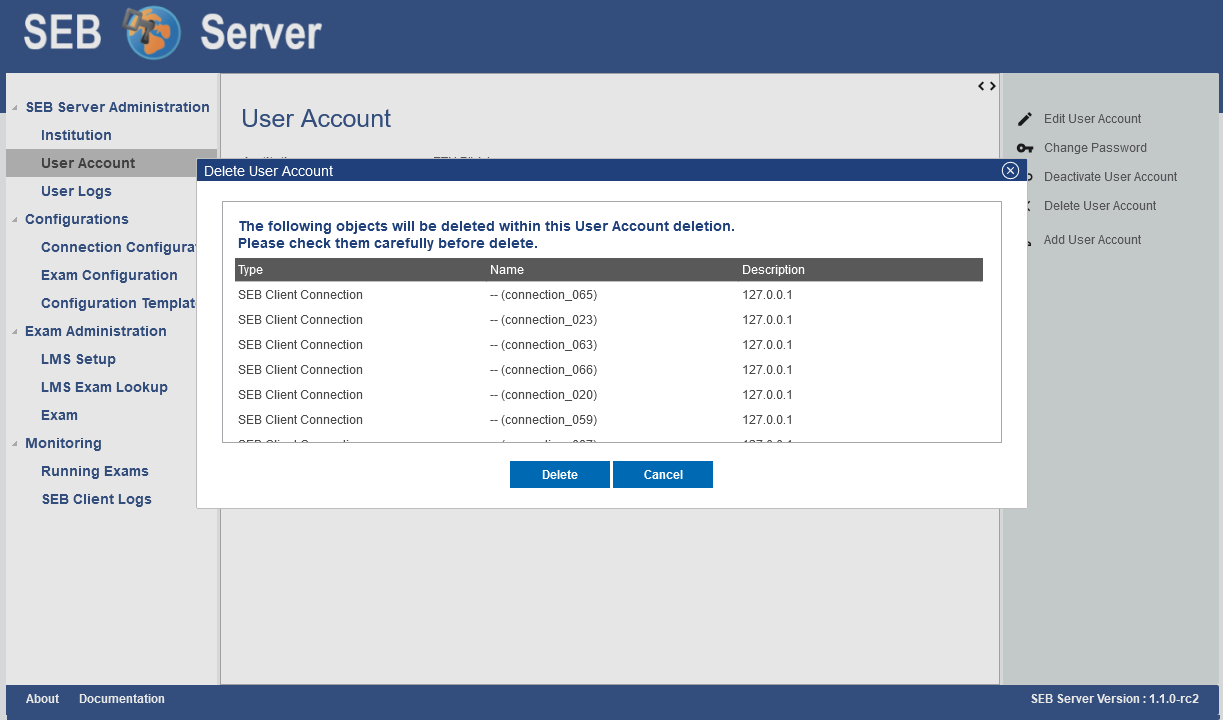
Use the “Delete User Account” action from the right action pane to open the deletion dialog.
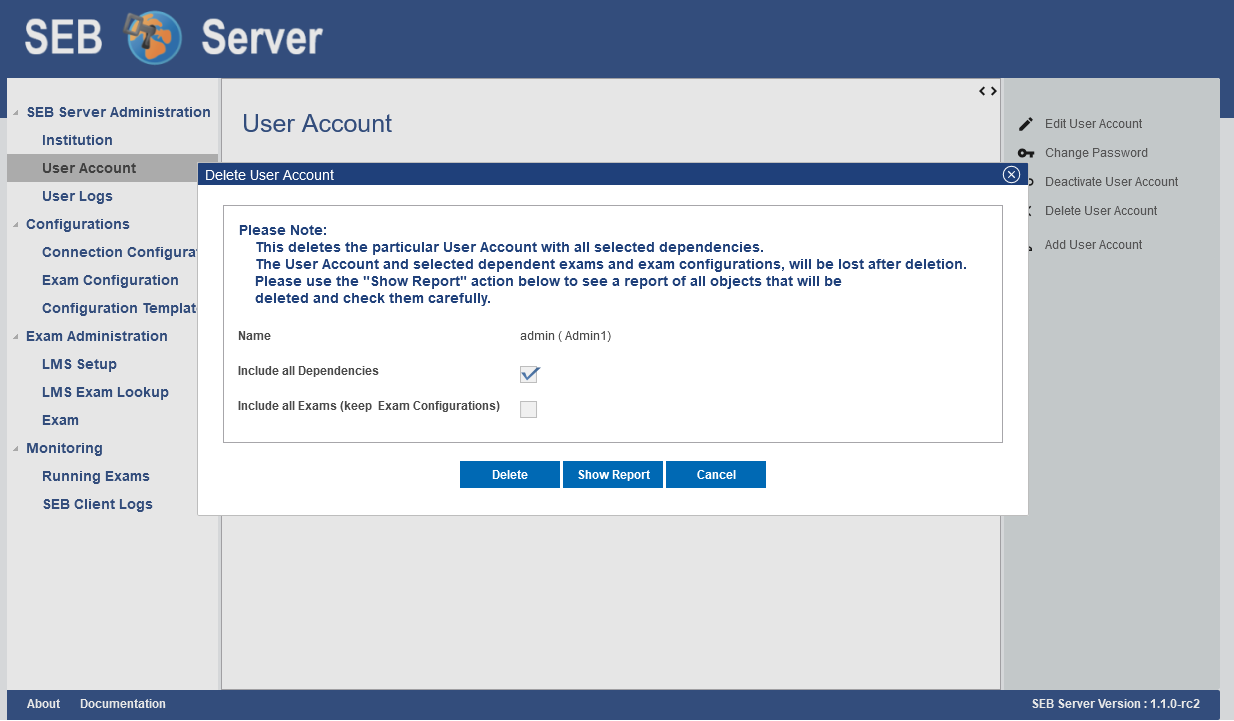
- Within the delete dialog you are able to delete either
Only the user-account with no dependencies at all (no selection)
The user-account with all dependencies (Include all Dependencies)
Or the user-account with only the exam dependencies, keeping the exam configurations (Include all Exams)
After you have made your choice, you can show a report that will show all dependencies that are deleted within the action. Use the “Show Report” action below the delete dialog to show the report or just use the “Delete” action to execute the delete.
In the deletion report you are able to check carefully every object that will be deleted within the action.