Screen Proctoring (New)
Overview
SEB Screen Proctoring is an integral component of the SEB Ecosystem, designed to monitor student screens during digital examinations. This tool captures and displays screenshots taken by SEB, ensuring a secure and controlled testing environment.
Enable Screen Proctoring after an exam is created in the exam view.
Since SEB Server version 2.1 you are able to configure Screen Proctoring groups that shall be created for Screen Proctoring on Exam import and were connecting SEB clients are scheduled to after they have successfully connected to SEB Server. Currently there are two different types of possible Screen Proctoring group generation. The default “One Group for Exam” where you only generate one Screen Proctoring group for the exam and can give them a name:

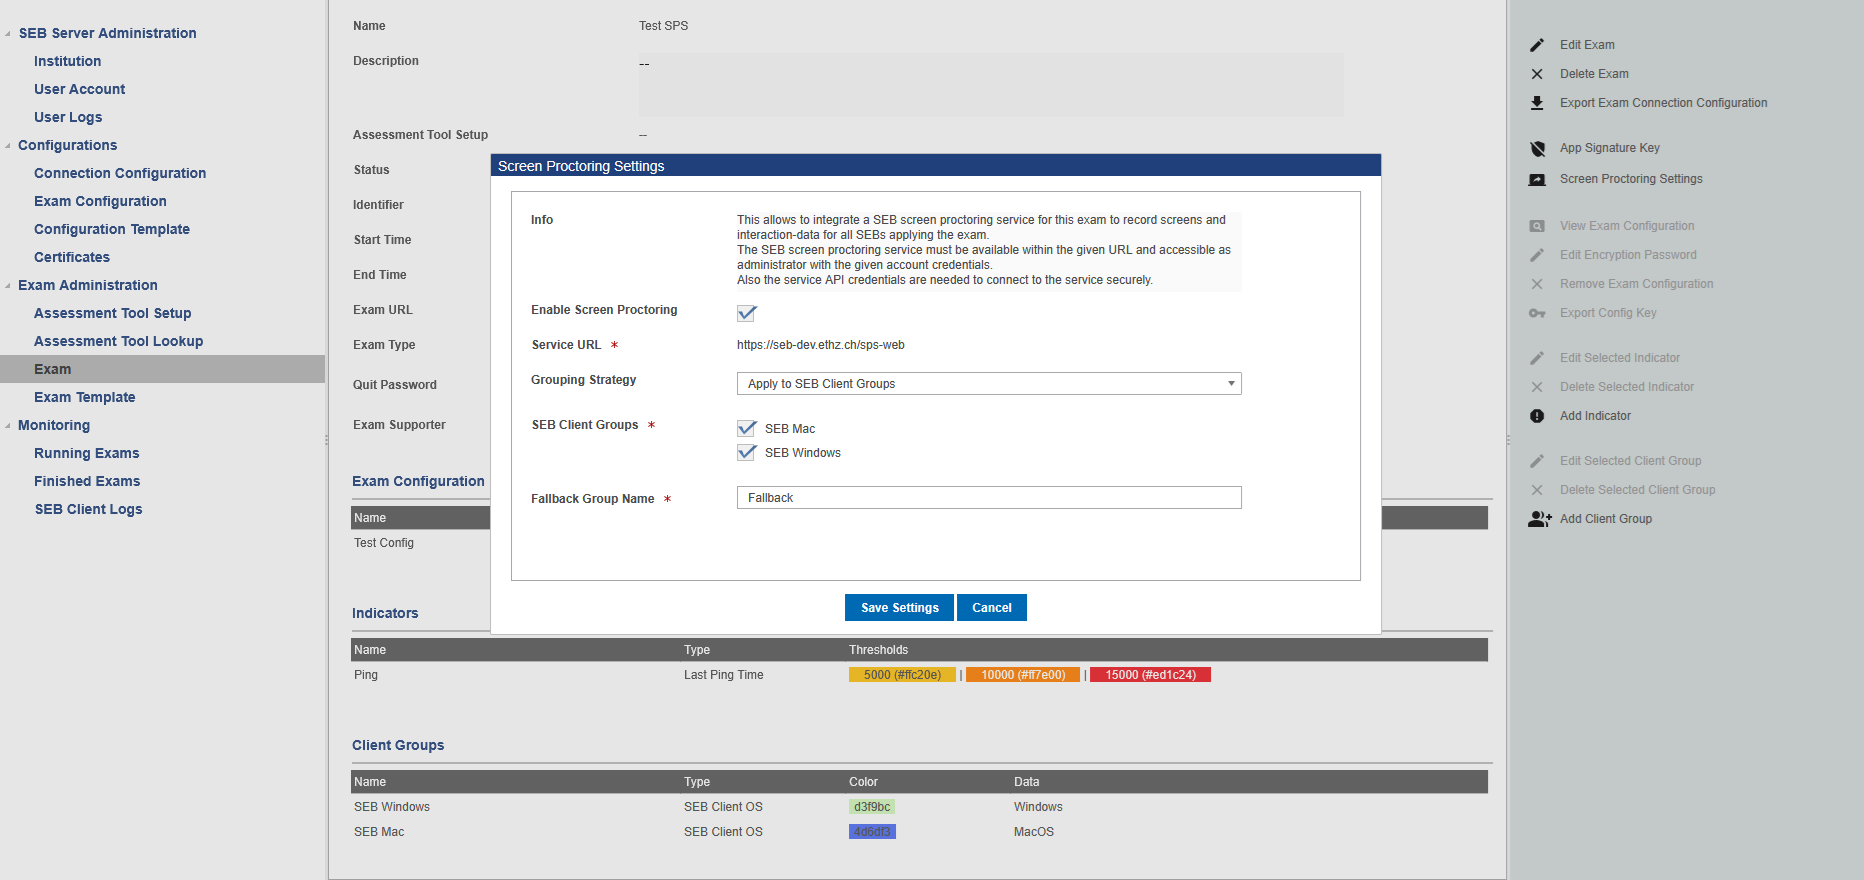
The other one is to apply the Screen Proctoring groups to existing Client Groups. When you define some Client Groups within the Exam and choose “Apply to SEB Client Groups” within the Screen Proctoring configuration pop-up, you are able to select the needed SEB Client Groups from the list of available SEB Client Groups and additionally can gave a name für the Fallback Group The Fallback Groups is been used to schedule connecting SEB clients to that do not belong to any of the selected SEB Client Groups
Since SEB Server version 2.1 enabling or disabling Screen Proctoring on Exam also automatically enables or disables Screen Proctoring on applied Exam Configuration SEB Settings.
Note
If you enabling or disabling Screen Proctoring in the SEB Settings of a Exam Configurations that is applied to the Exam, this will not automatically apply to the Screen Proctoring settings of the Exam (only the other way around).Configuration
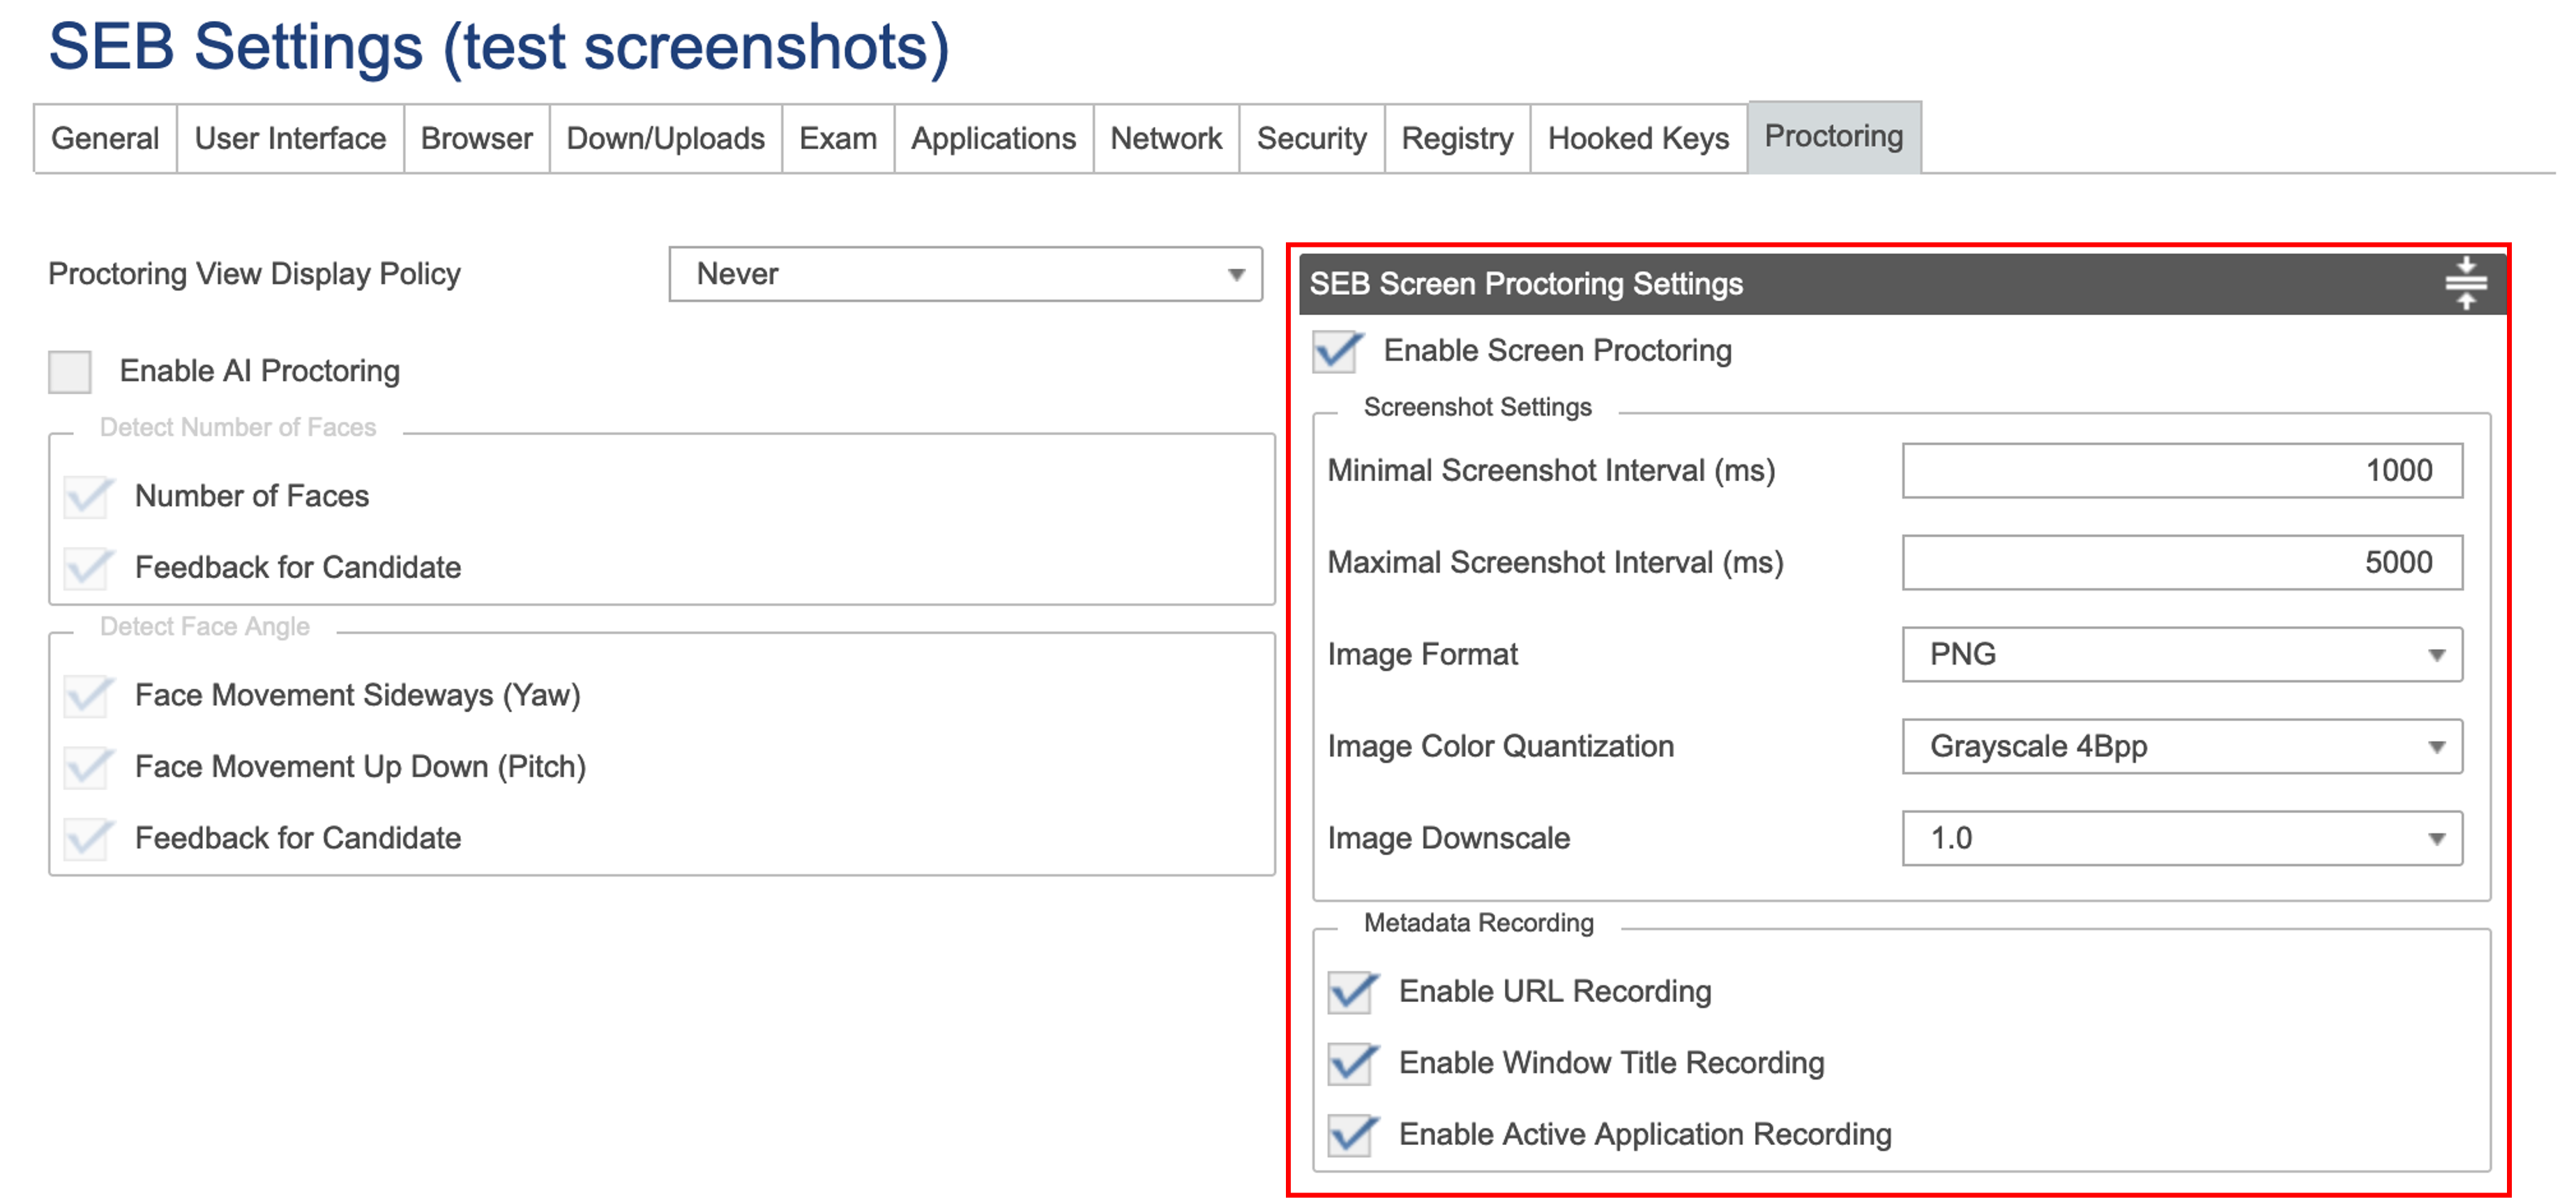
Before starting an Exam with Screen Proctoring we recommend to always make sure Screen Proctoring is enabled for the Exam as well as for the SEB Clients within the Exam Configurations SEB Settings of the Exam.
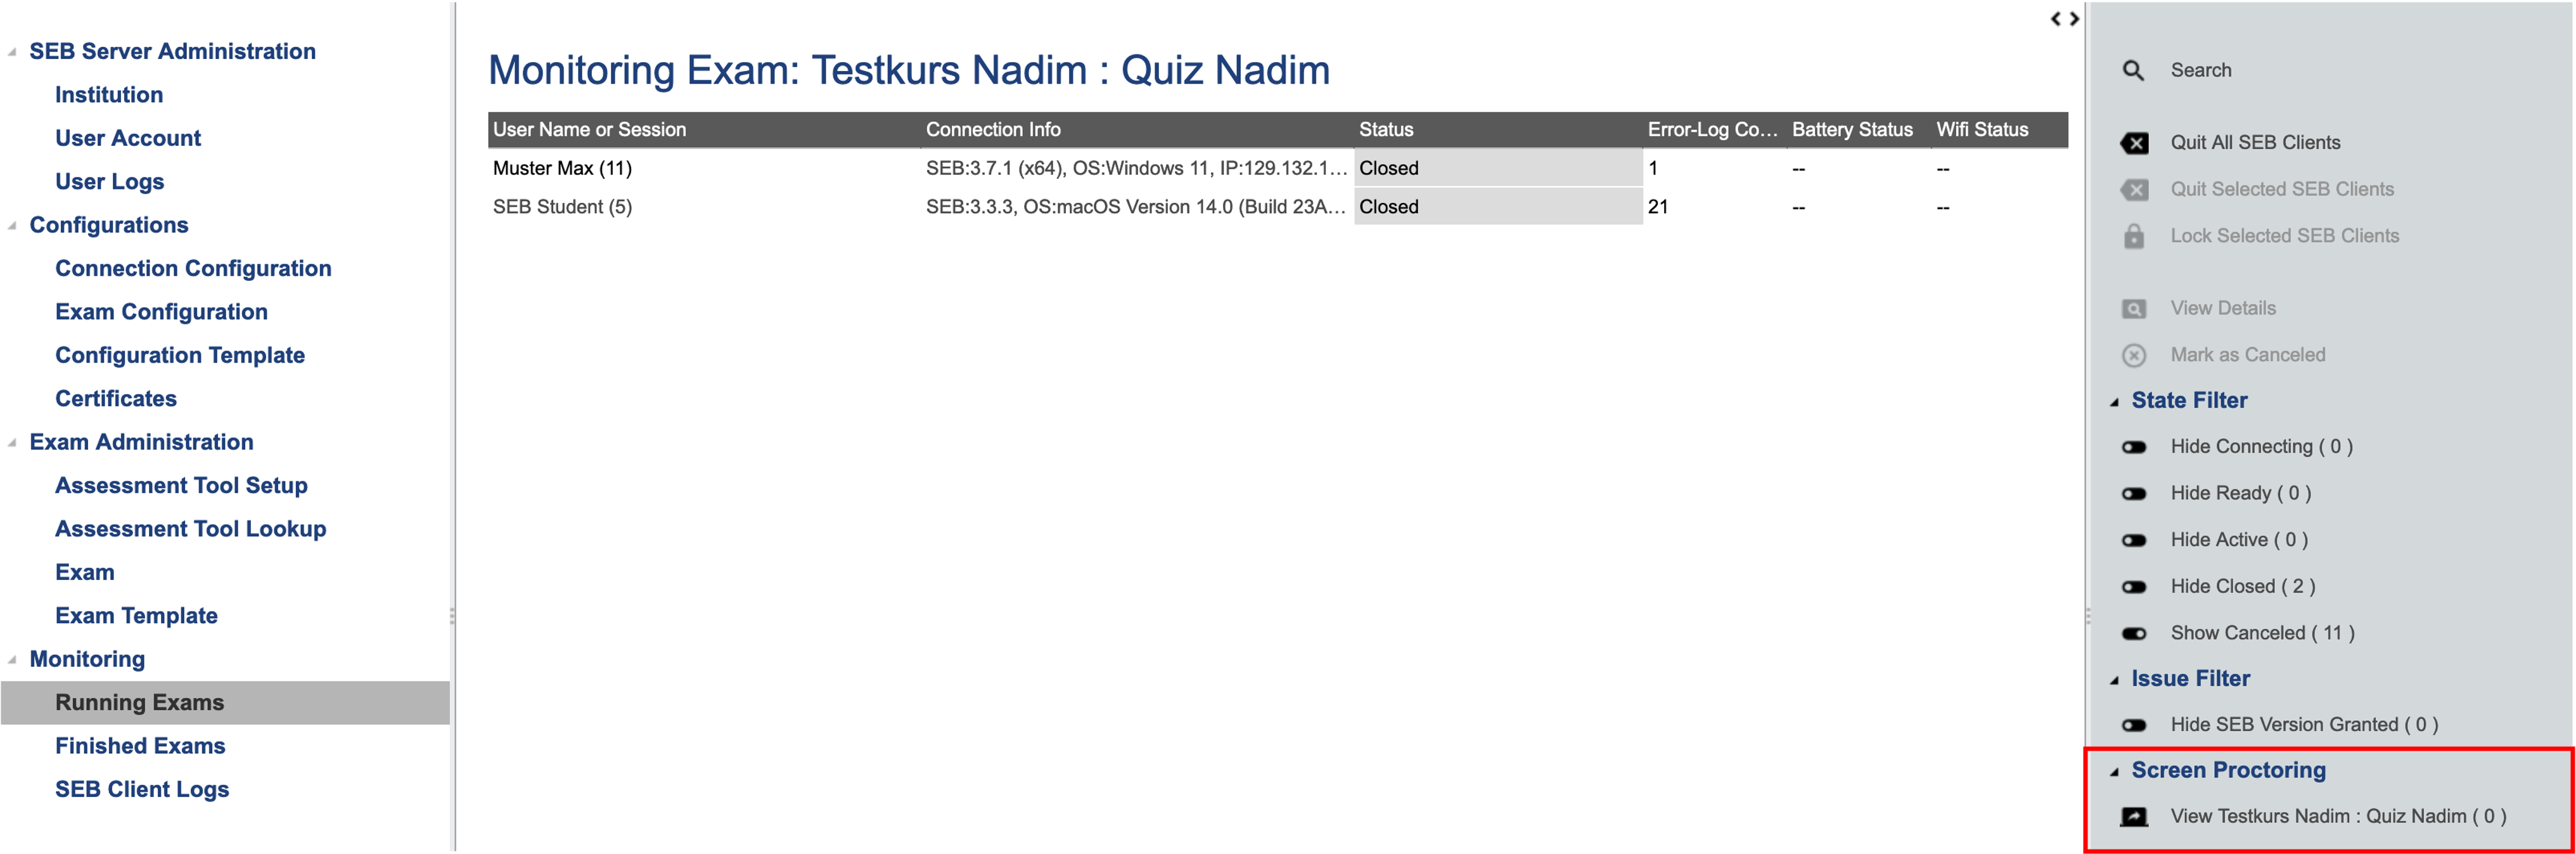
SEB-Server and SEB are now ready to capture and to display screenshots. Navigate to exam monitoring and click the button in the Screen Proctoring section. A new tab will be opened.
Gallery View
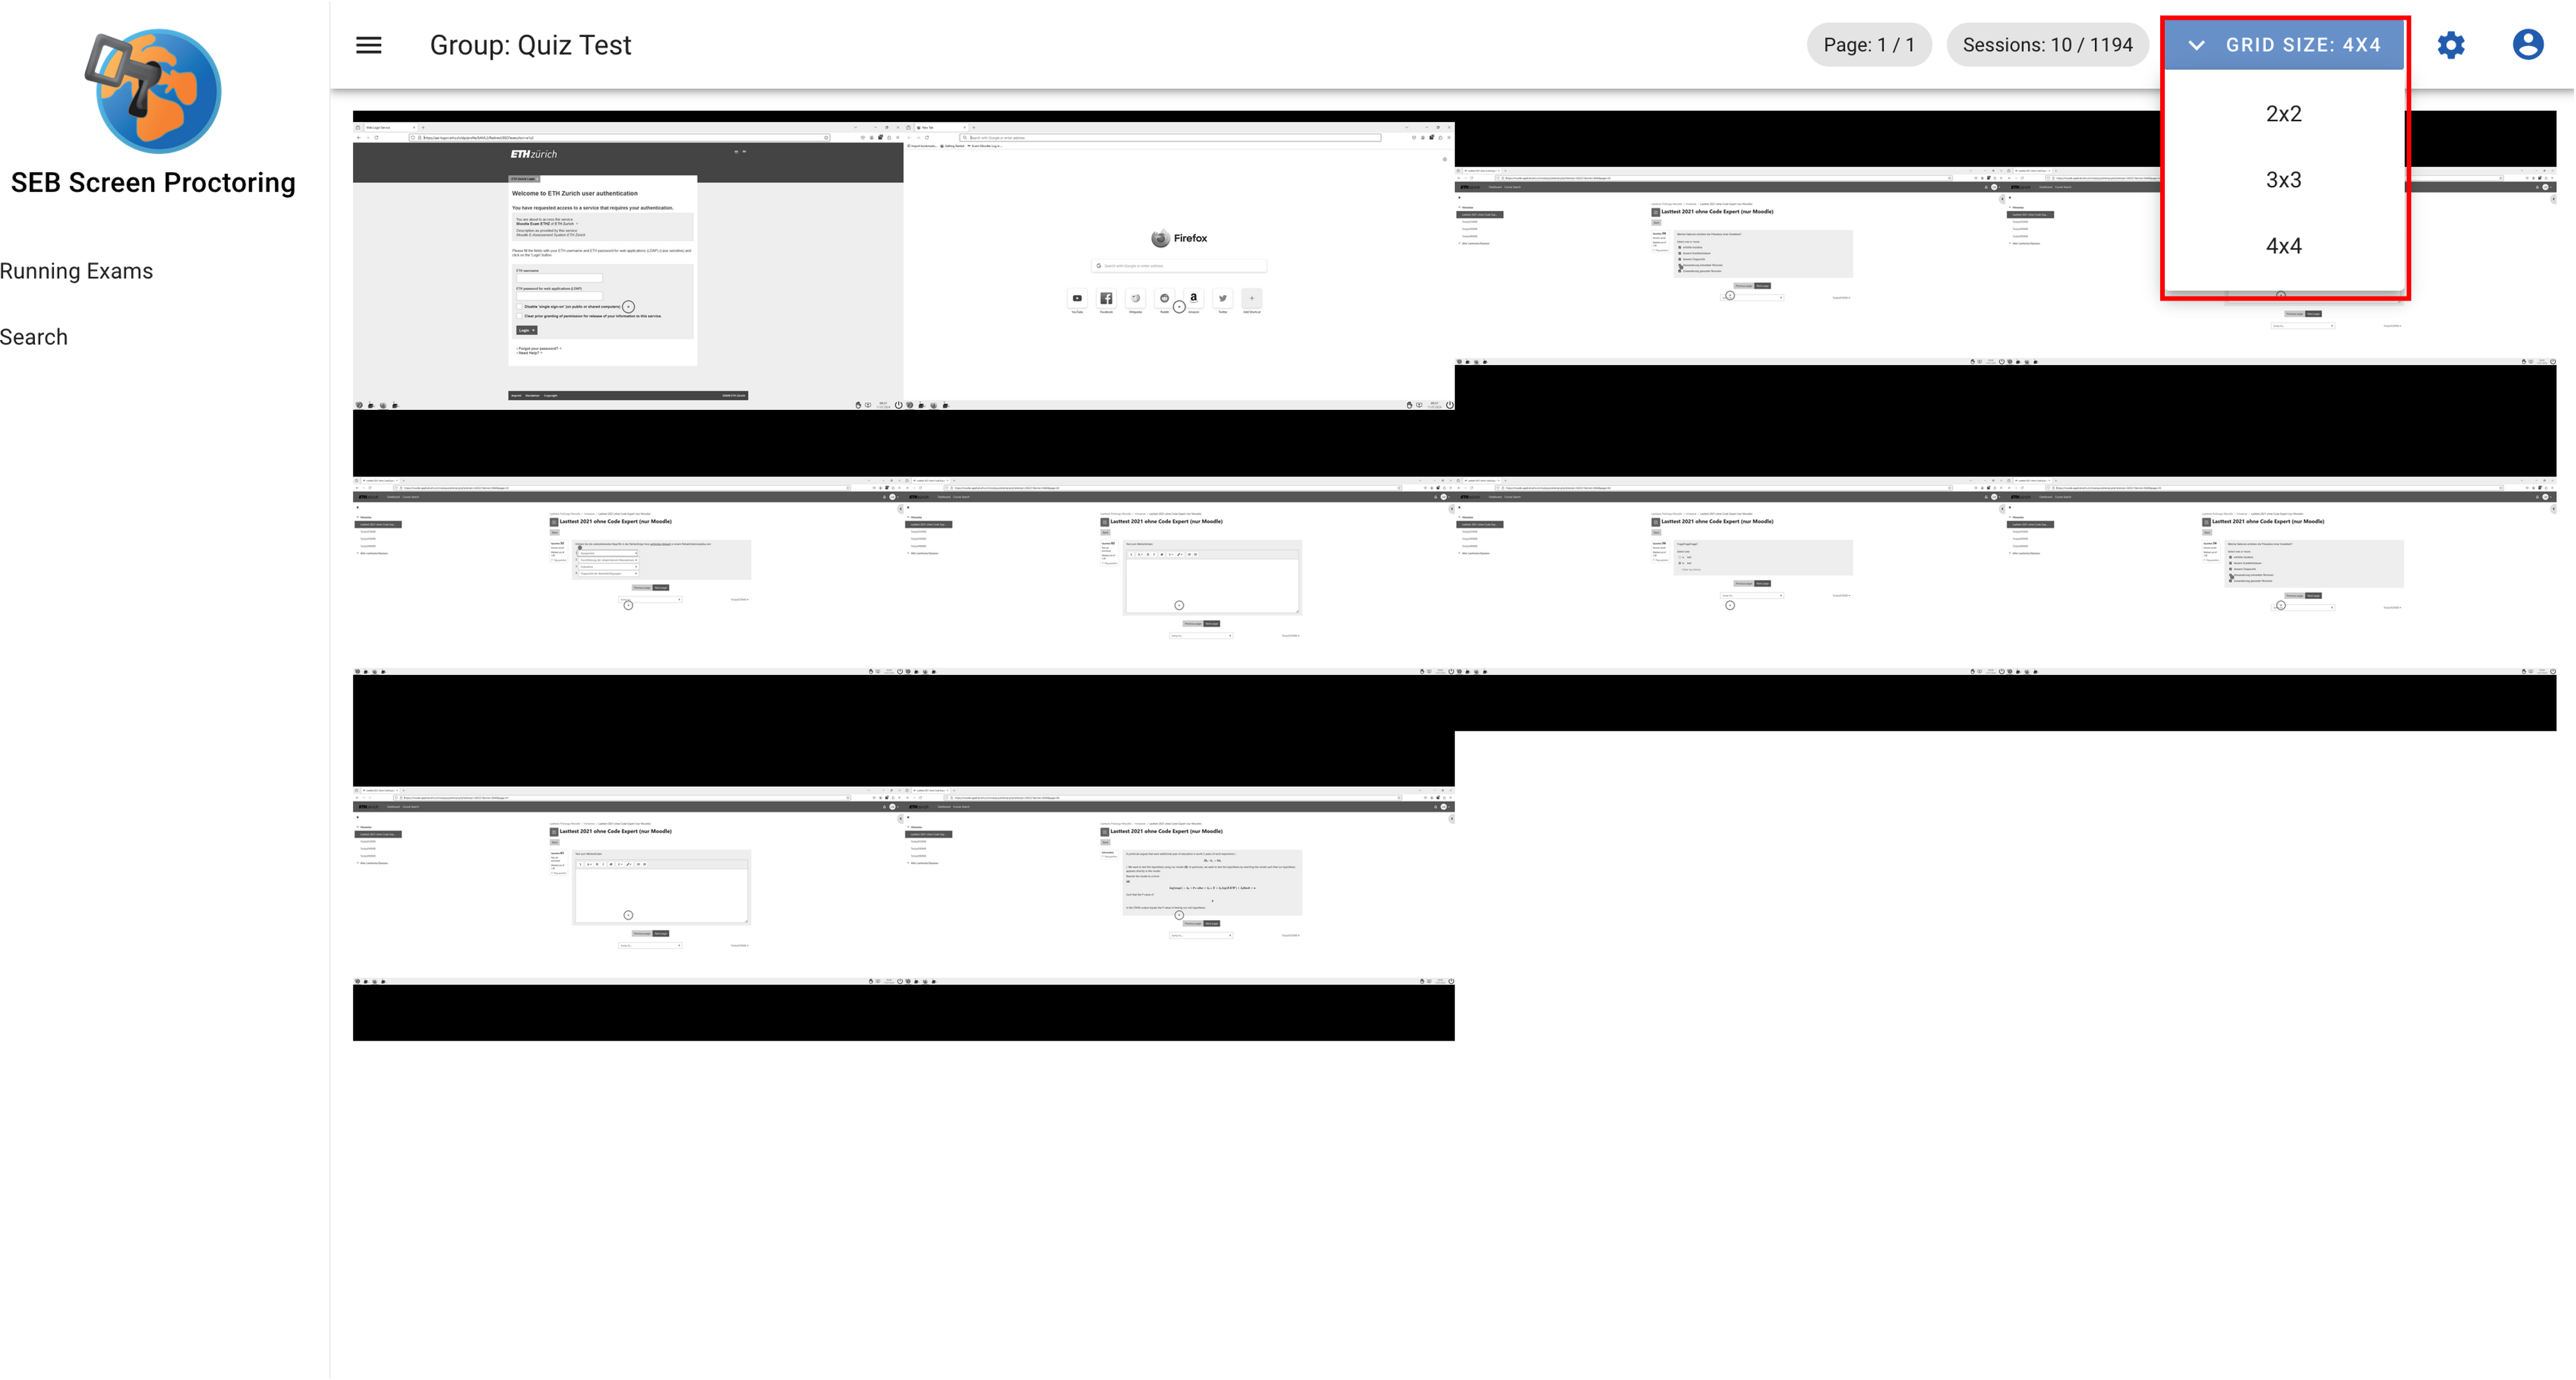
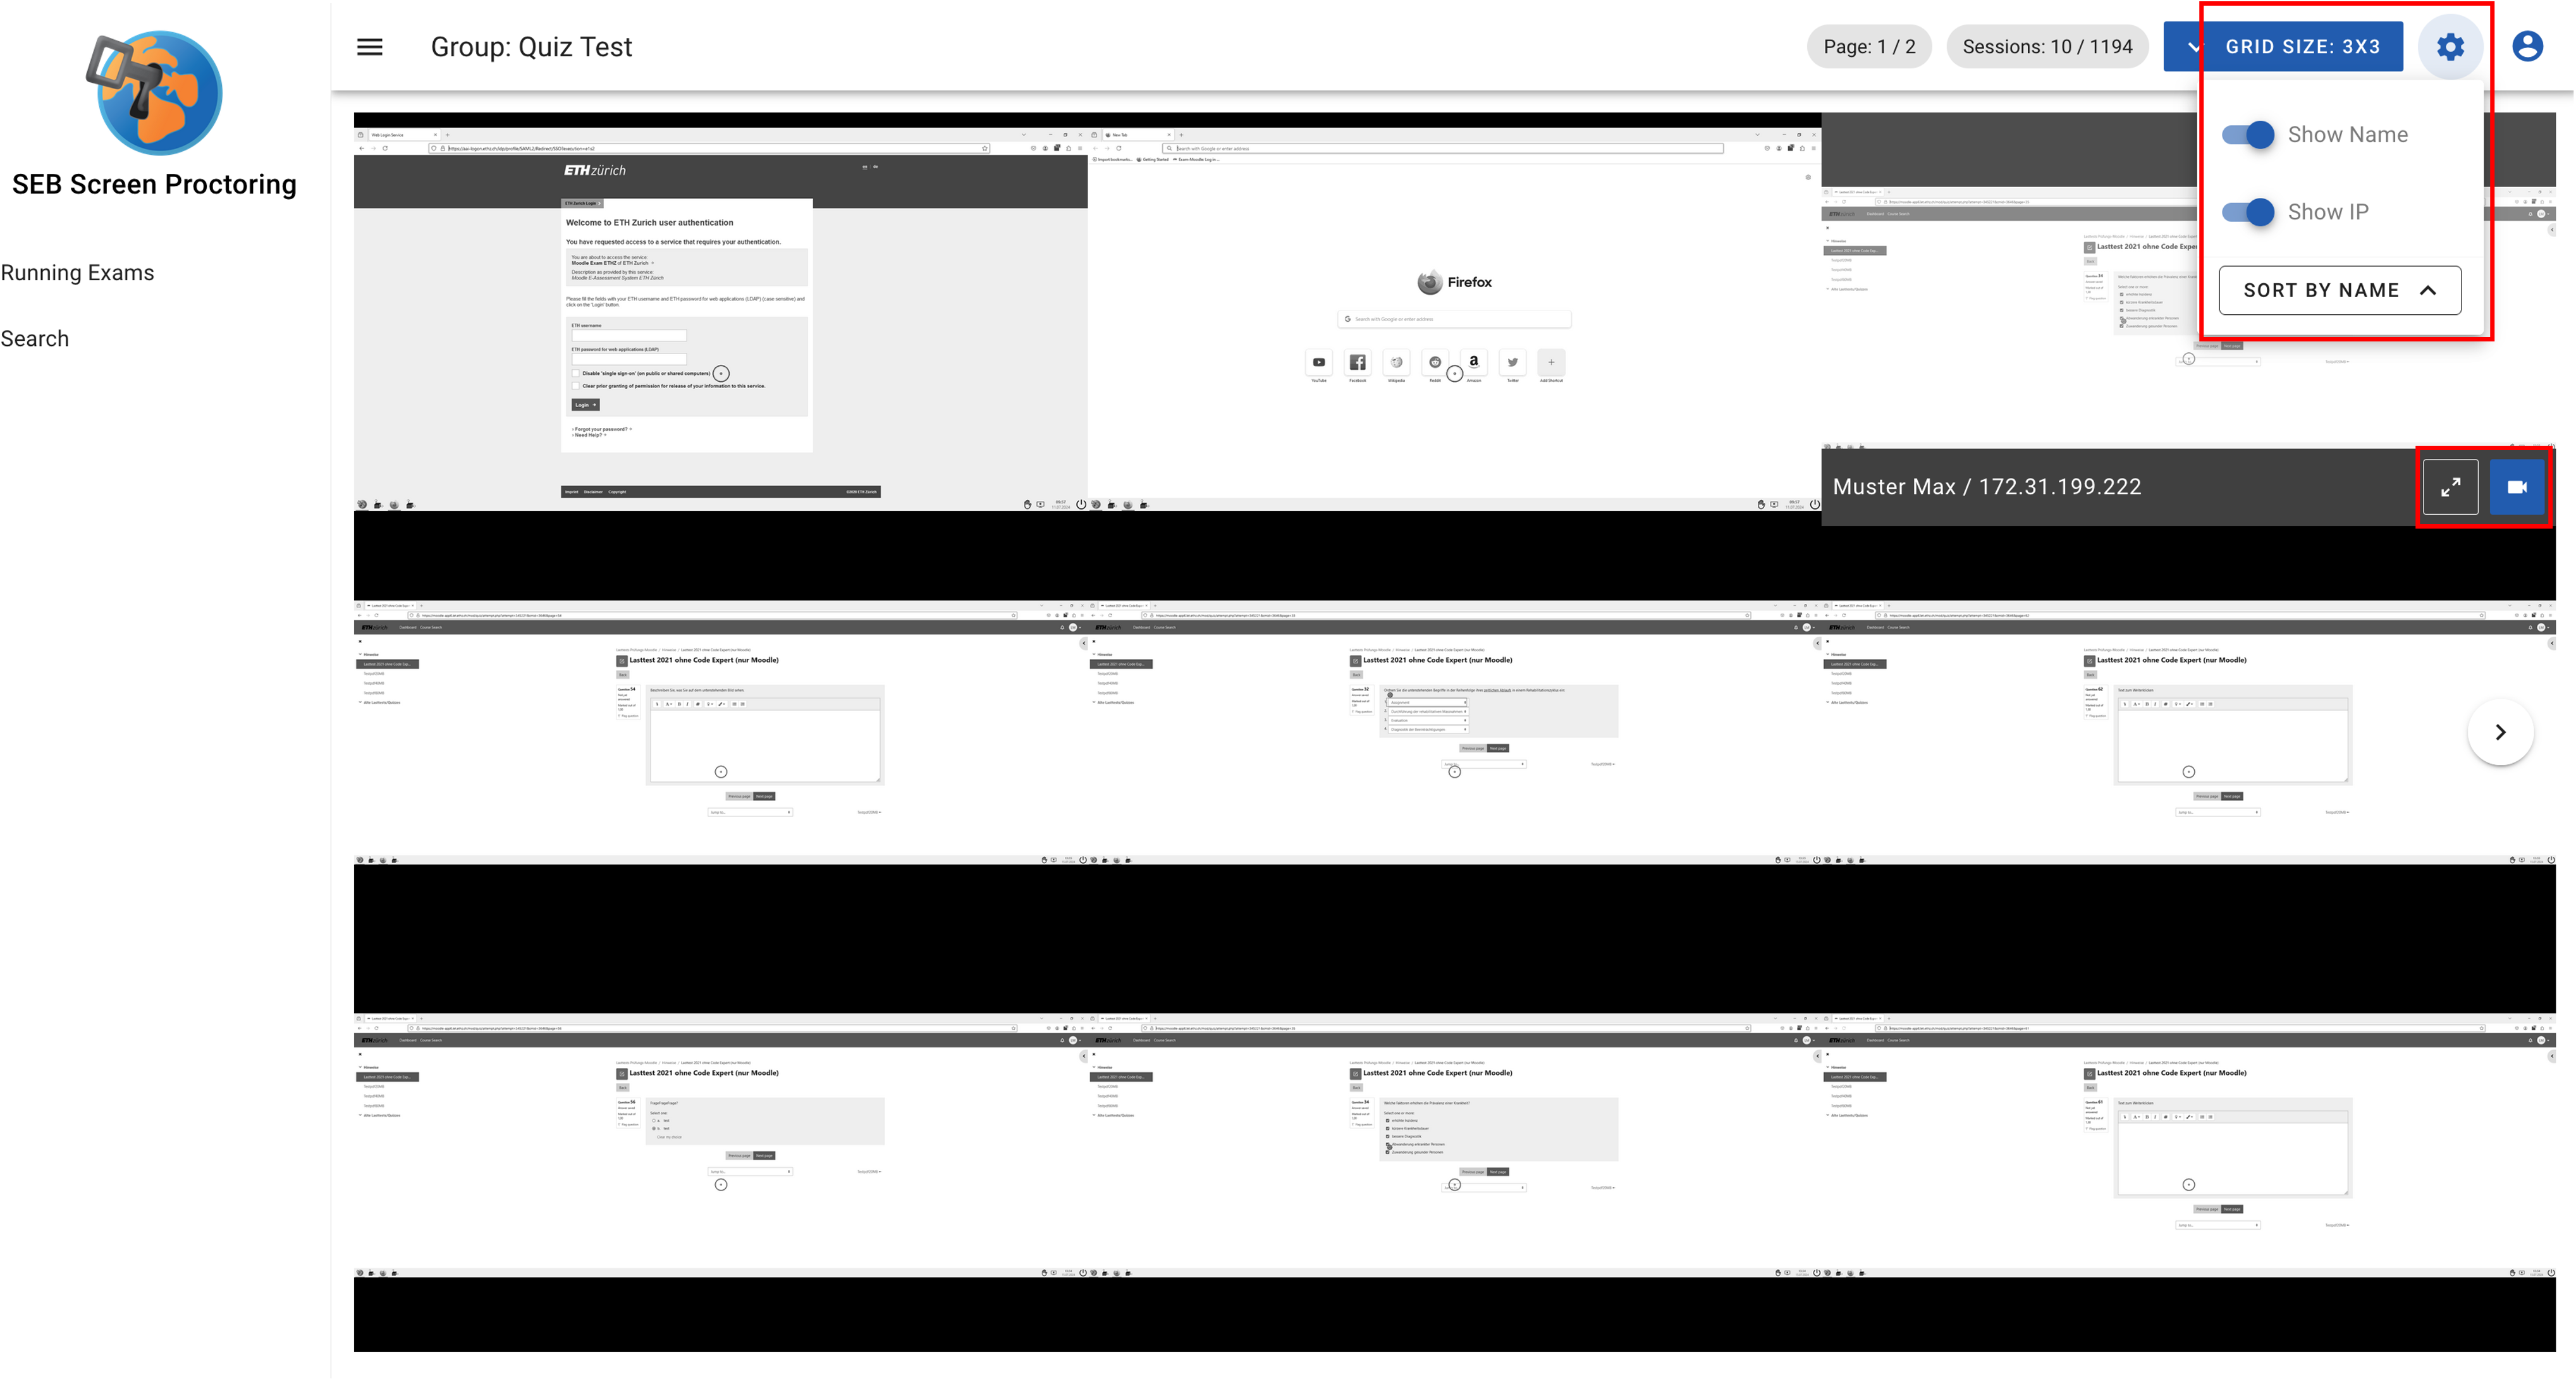
When a SEB is connected to SEB-Server and the user is logged into LMS, a tile with the latest screenshot will appear.
Press the “Grid-Size” dropdown to change the displayable sessions per screen to 4, 9 or 16.
Use the arrow buttons and the left and right on the screen to change windows. The current page and the number of live sessions / total sessions is display next to the grid selection.
Use your mouse to hover over a tile or press the tab key. A “selected” tile reveals information and actions for the session.
To change view preferences press the settings icon in the top right corner.
Toggling “Show Name” and “Show IP” reveals the the Name and IP of the selected session.
By default, all the sessions are sorted by lastname in ascending order. To change this press the “Sort by Name” button.
The camera icon opens the Proctoring View in a new tab. See chapter “Proctoring View” for more infos.
Click on the “expand”-icon to enlarge the screenshot.
The SEB-Client additionally sends metadata about the screenshot
Metadata changes according to the content displayed on the screenshot
Refer to the chapter “Metadata” for more details
The camera icon opens the Proctoring View in a new tab. See chapter “Proctoring View” for more infos.
Close the expanded view either by clicking on the collapse button or somewhere outside of the screenshot

A message box indicates that there are no live sessions available
As soon as a sessions are connected the message box will disappear
Running Exams
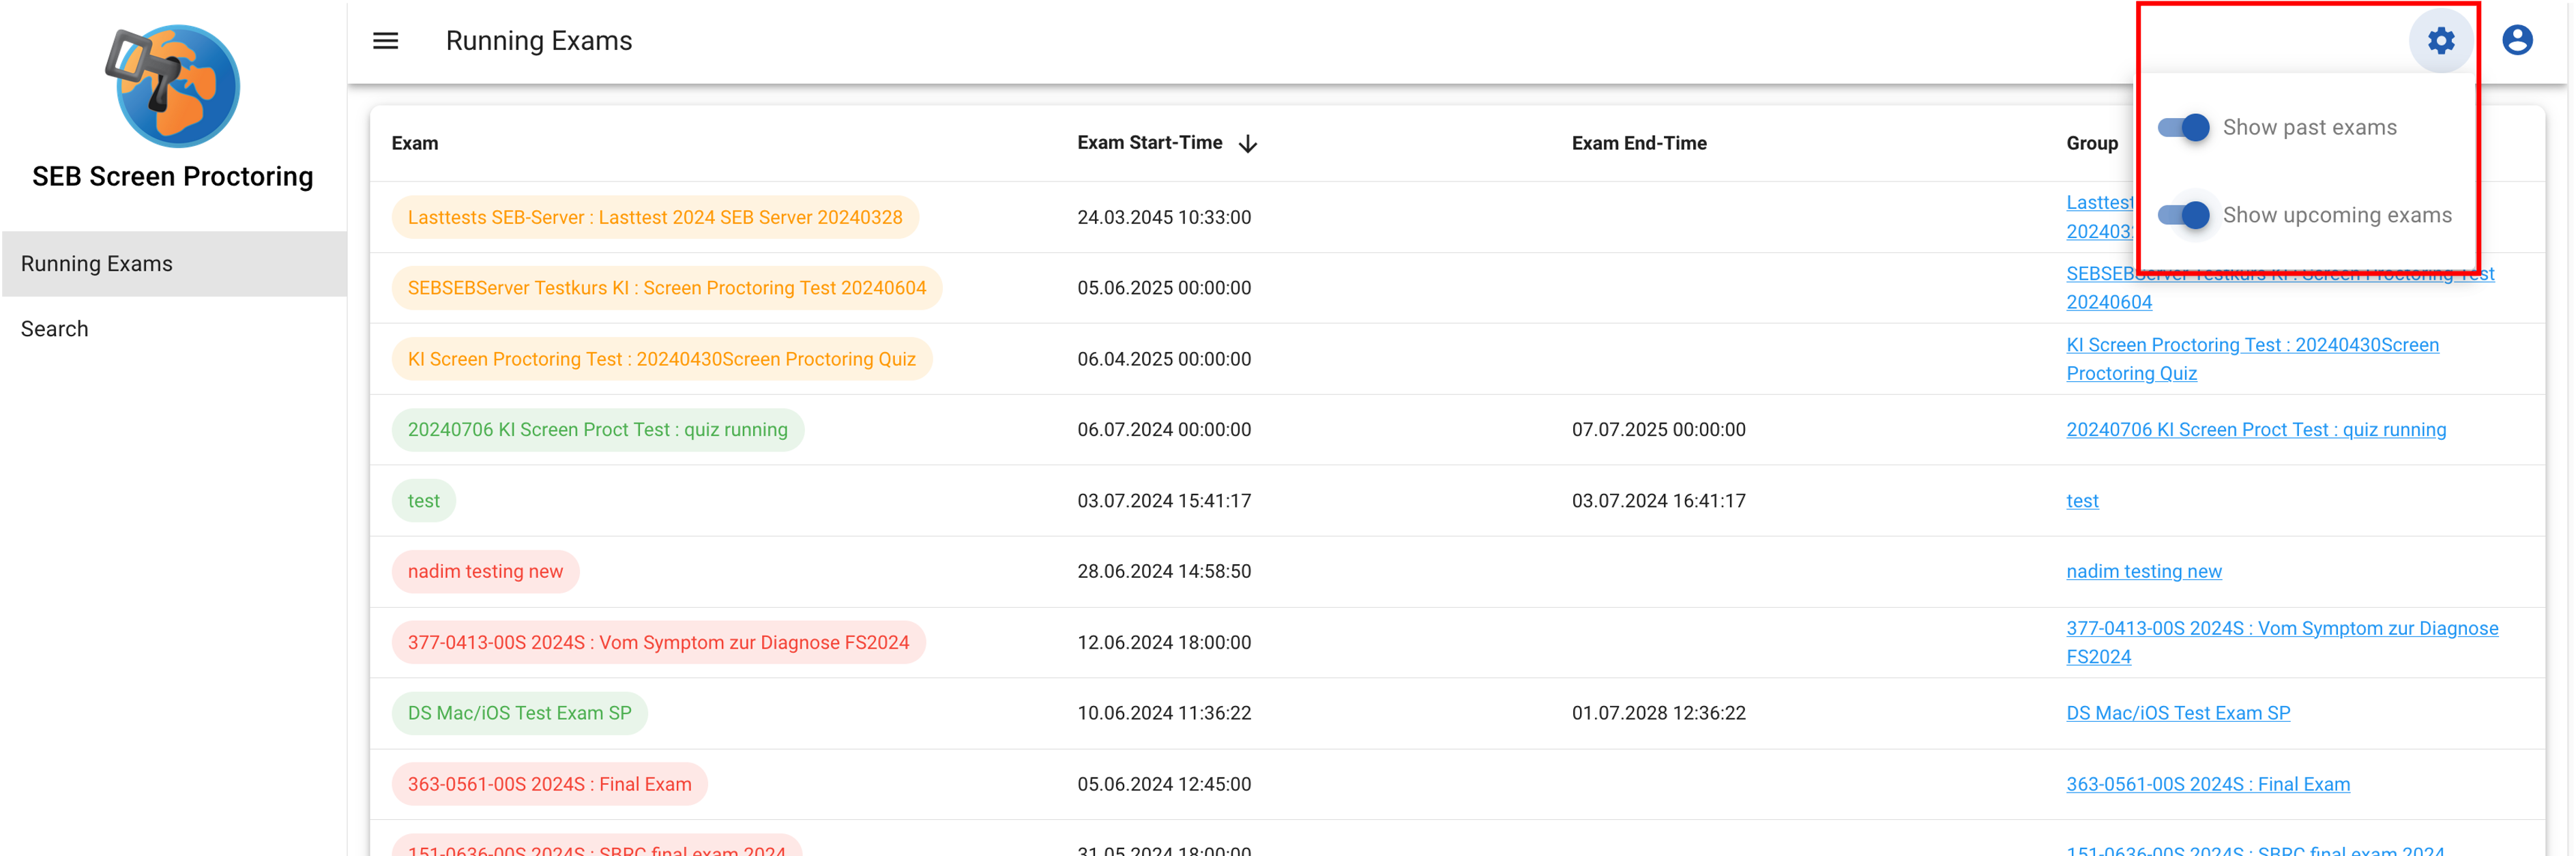
To get an overview of all running exams which your user has access to click on the “Running Exams” item in the navigation bar on the left side.
By default, the exams are sorted by “Exam Start-Time” in ascending order
Click on any table header to change the sorting according to your needs
Click on the link the “Group” column to get to the gallery view of the group

By clicking on the settings icon in the menu bar two options are displayed.
Select “Show past exams” to display all finished exams (red)
Select “Show upcoming exams” to display all exams which are planned for the future (orange)
Proctoring View
The proctoring view shows a recorded or live session in more detail.
To open a proctoring view of a sessions, either:
Click on the camera icon in the gallery view
Use the search feature
Directly type in the url in the address bar: https://<your host>/recording/<sessionUuid>
A session can either be live or recorded. - A live session is indicated by the “Live” button - Navigating to the proctoring view during a live session always displays the latest screenshot and updates it accordingly - Use the slider like any other video player - This is also possible during a live session - Click on the “Live” button to jump to the latest screenshot
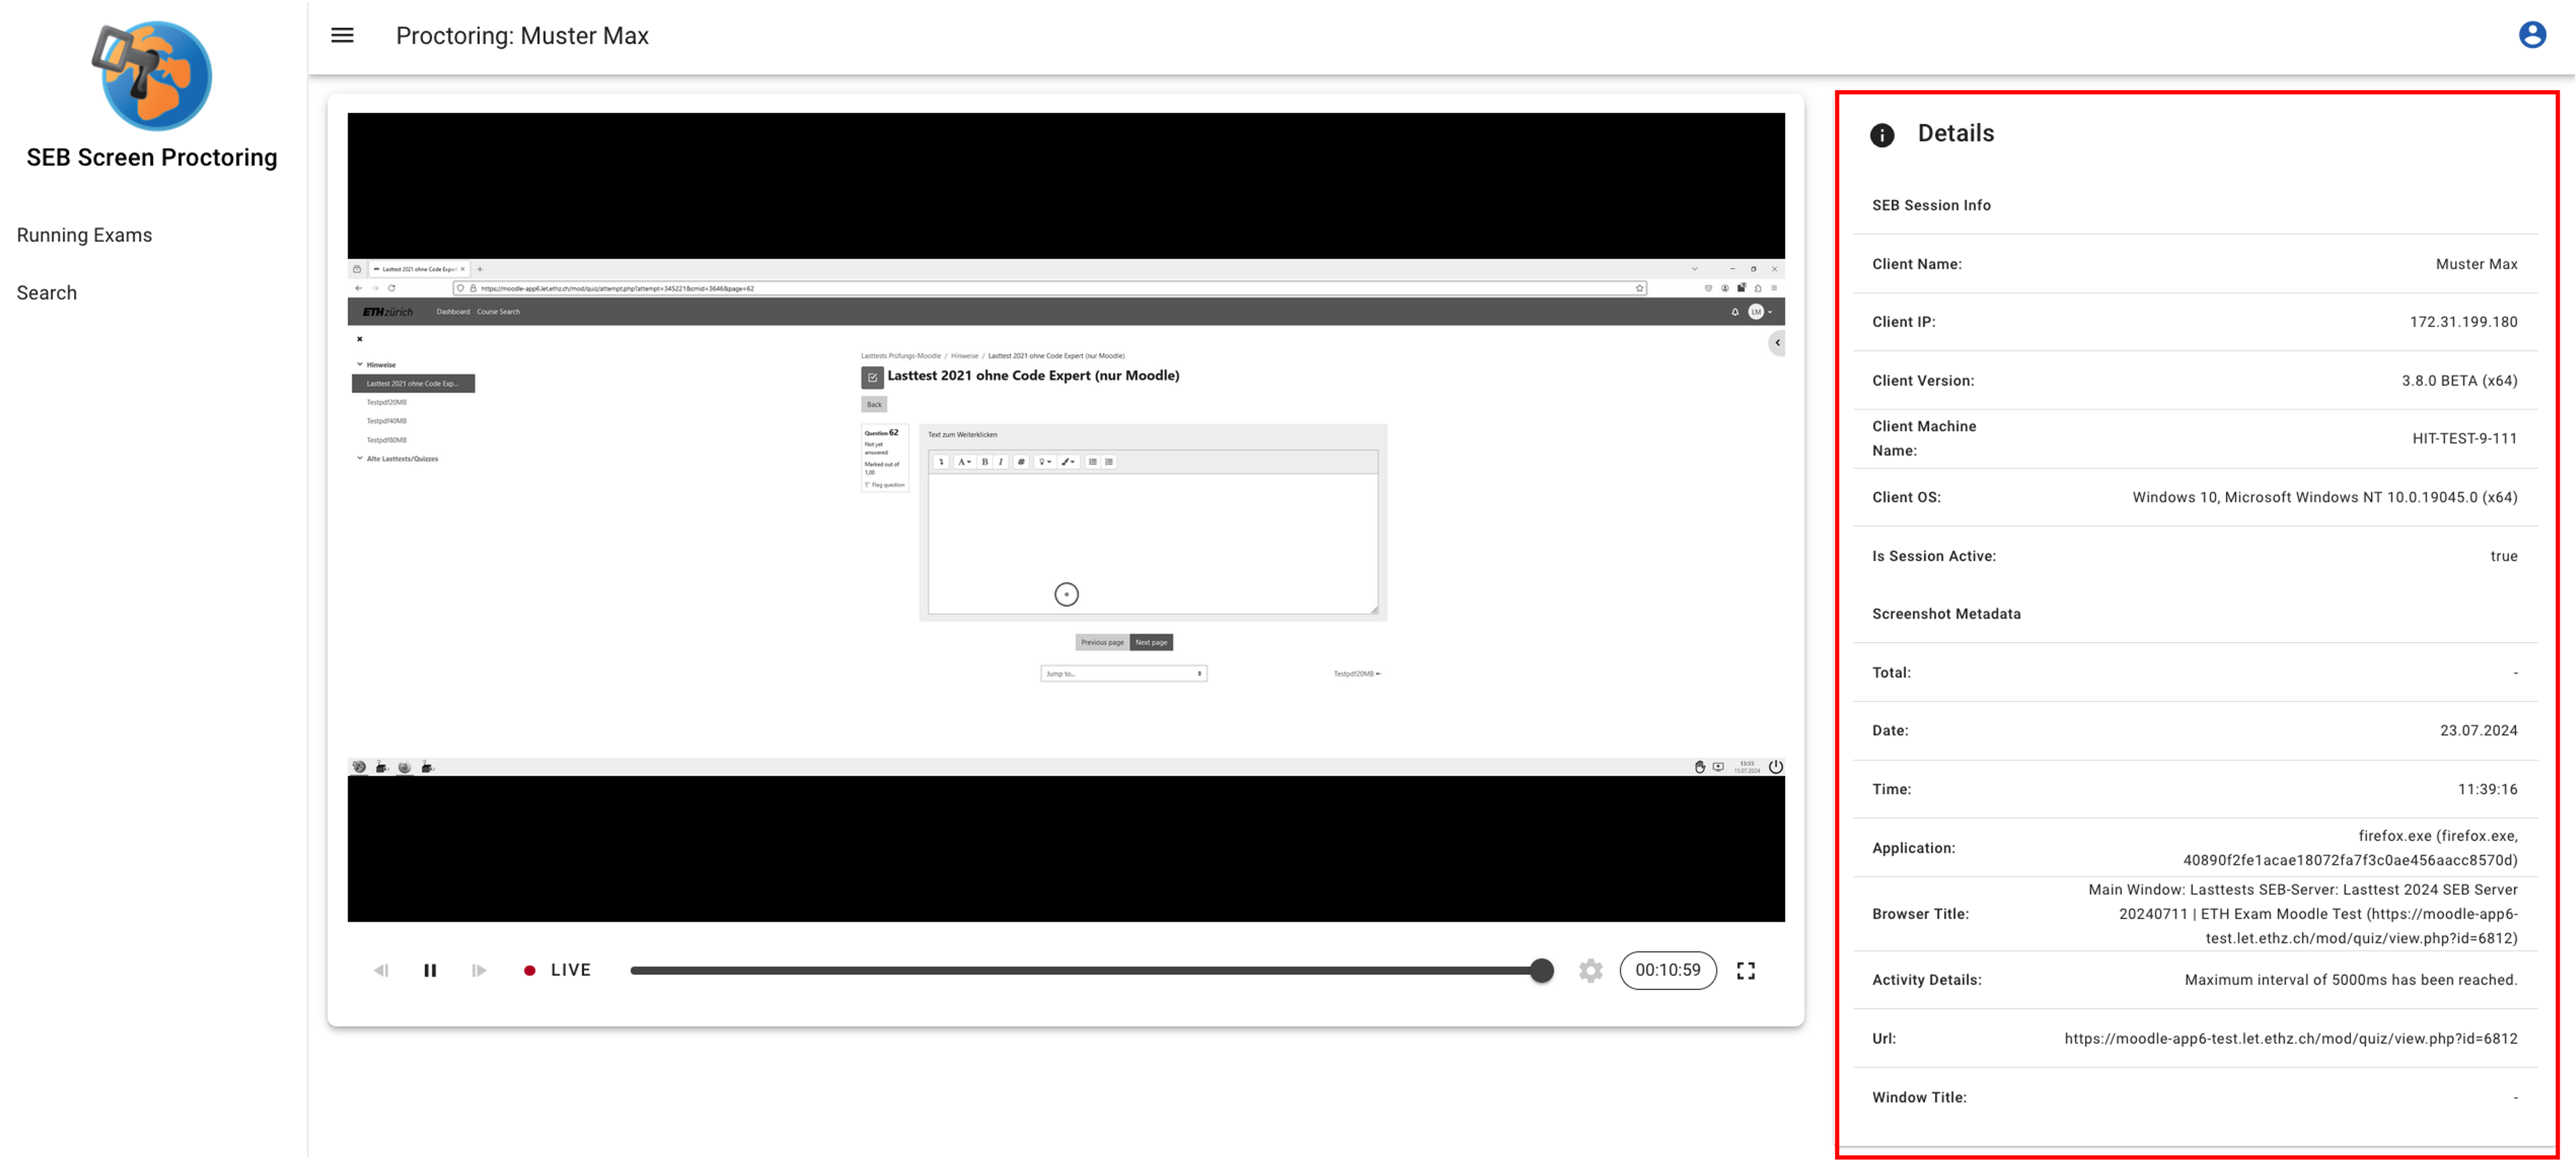
The “Details”-Box on the right side displays information about the session and the current screenshot
“SEB Session Info” is static
“Screenshot Metadata” dynamically changes for every Screenshot
Refer to the chapter “Metadata” for more details
The “Live” button disappears when the sessions disconnects from the server
Set the playback speed with the “settings”-icon according to you preferences
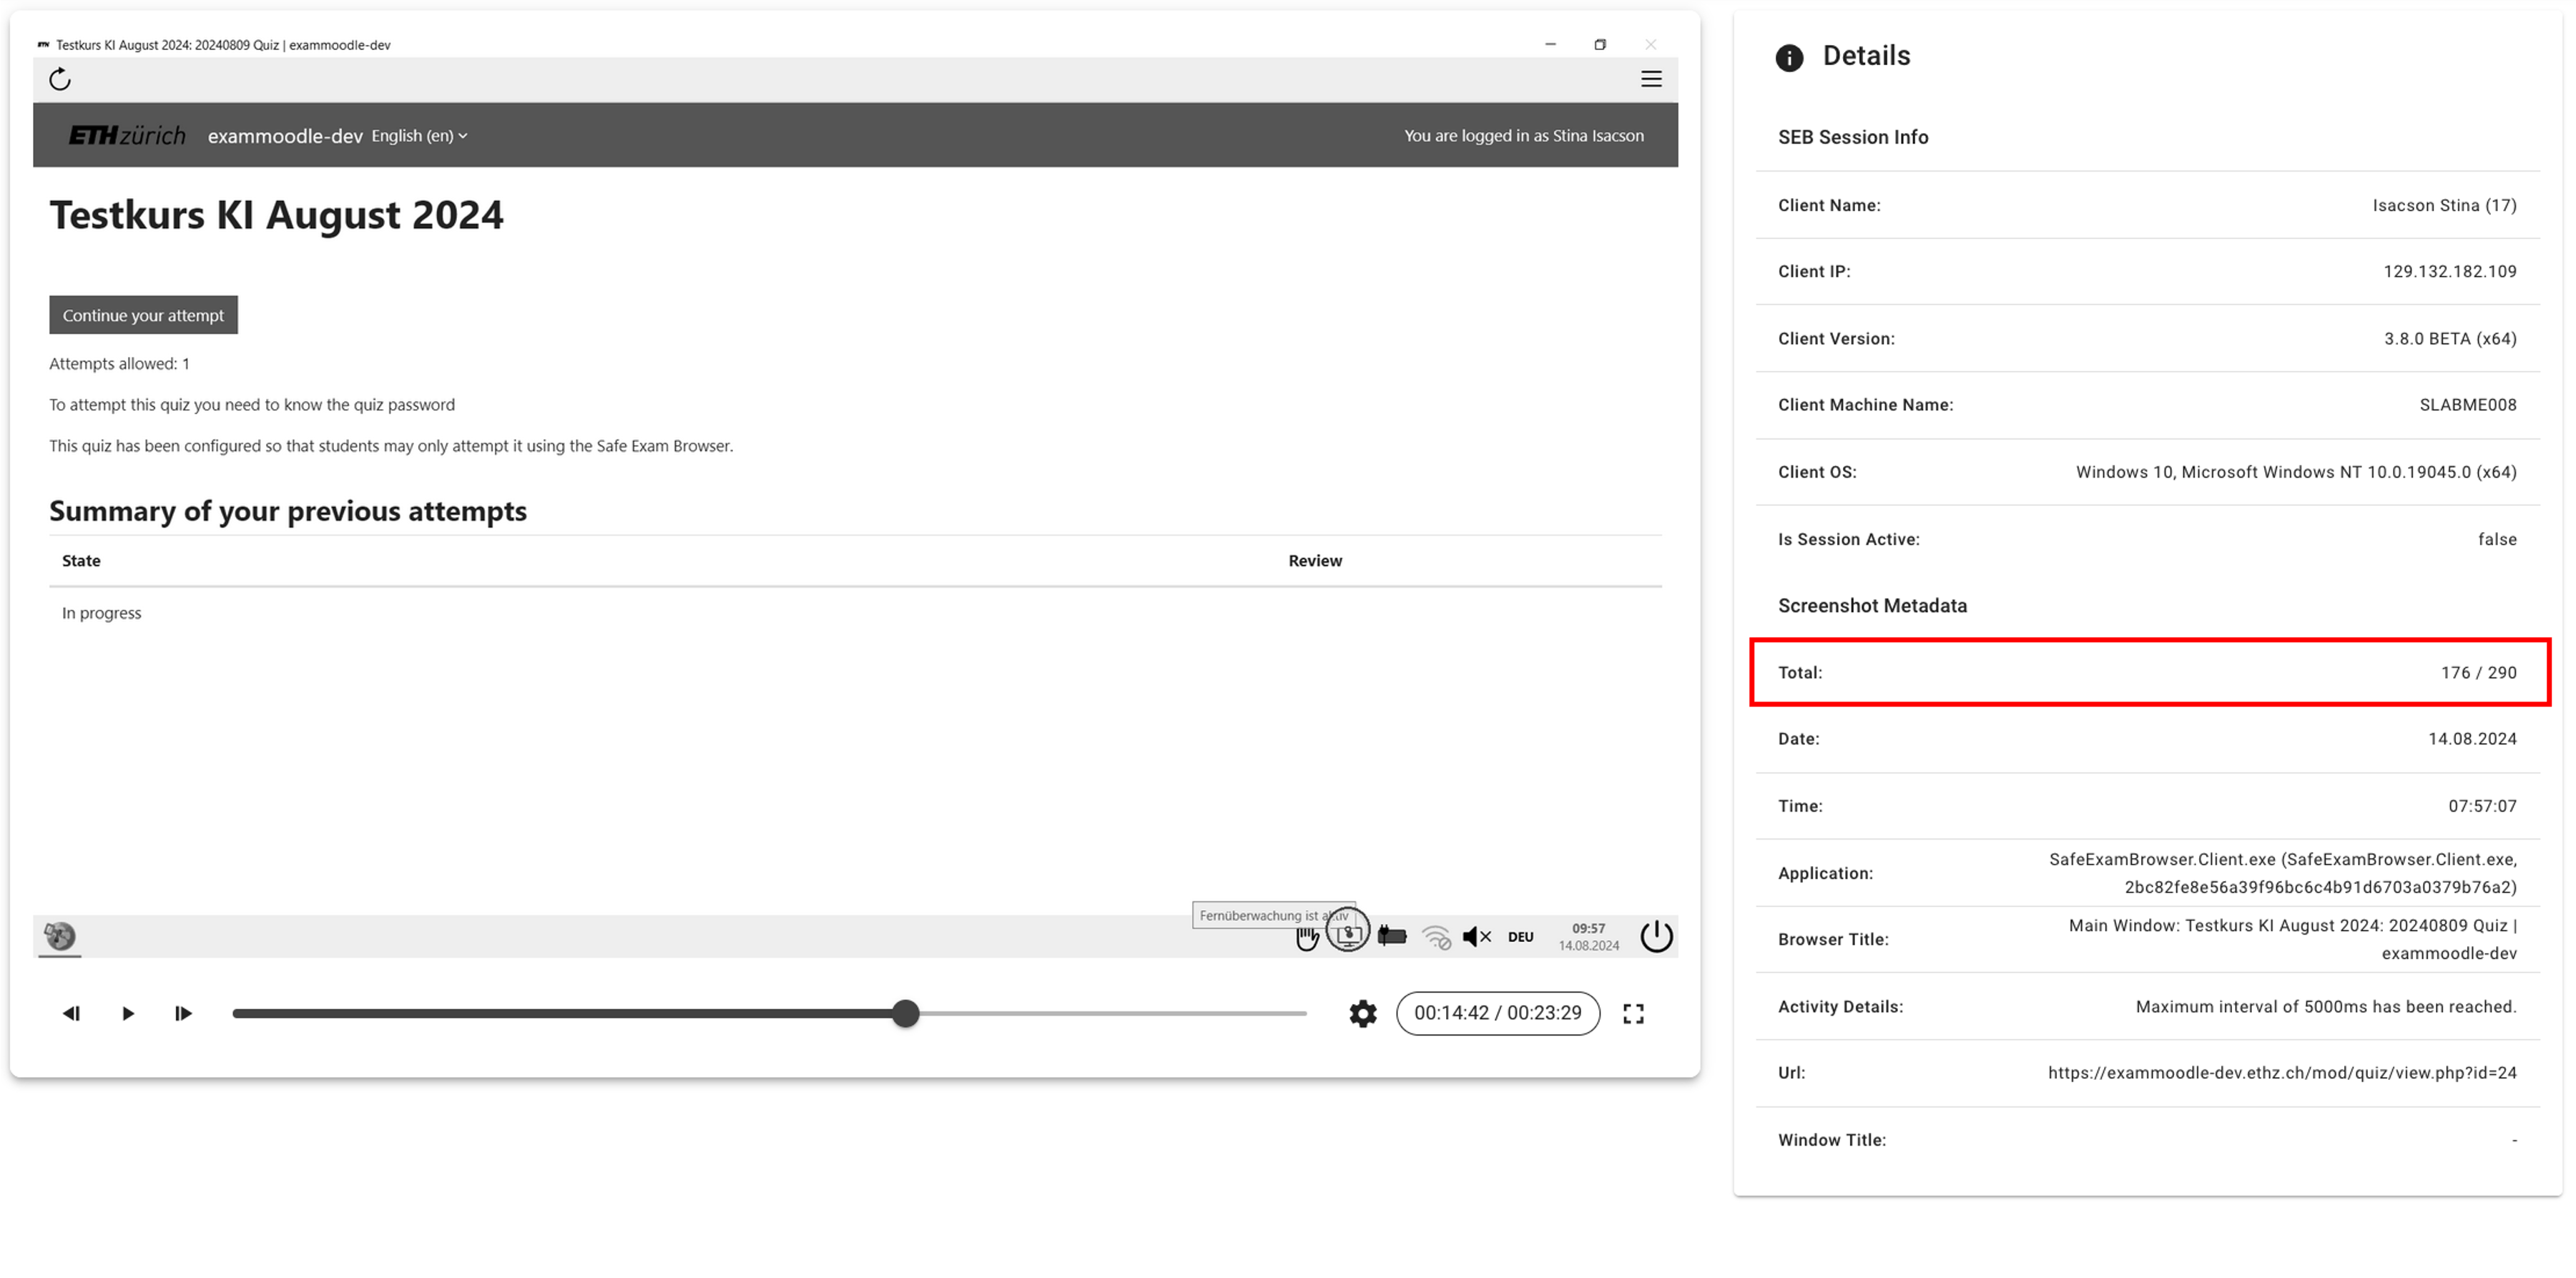
The current screenshot and the total amount of screenshot is display in the “Total”-Row
Search
The search functionality is a powerful feature for finding sessions and screenshots. Click on the “Search” item in the navigation bar on the left side.
Form
The upper part of the page is the search form. There are four different categories of search criteria:
Exam data
Session / user data
Screenshot metadata
Time data
Use the form fields and the time / date selection to tailor the search result to your needs.

Search Results
The search results are grouped into days and sorted by date in descending order. Use the “date” button on the right side to change the sort oder.
Clicking on any date expands the panel and displays all sessions (a session is a student using SEB) with recordings on that day
By default, the sessions are sorted by “Start-Time” in descending order
Click on the table header to change the sorting according to your preferences
A click on the down facing arrow on the right side lists all screenshots of the given student
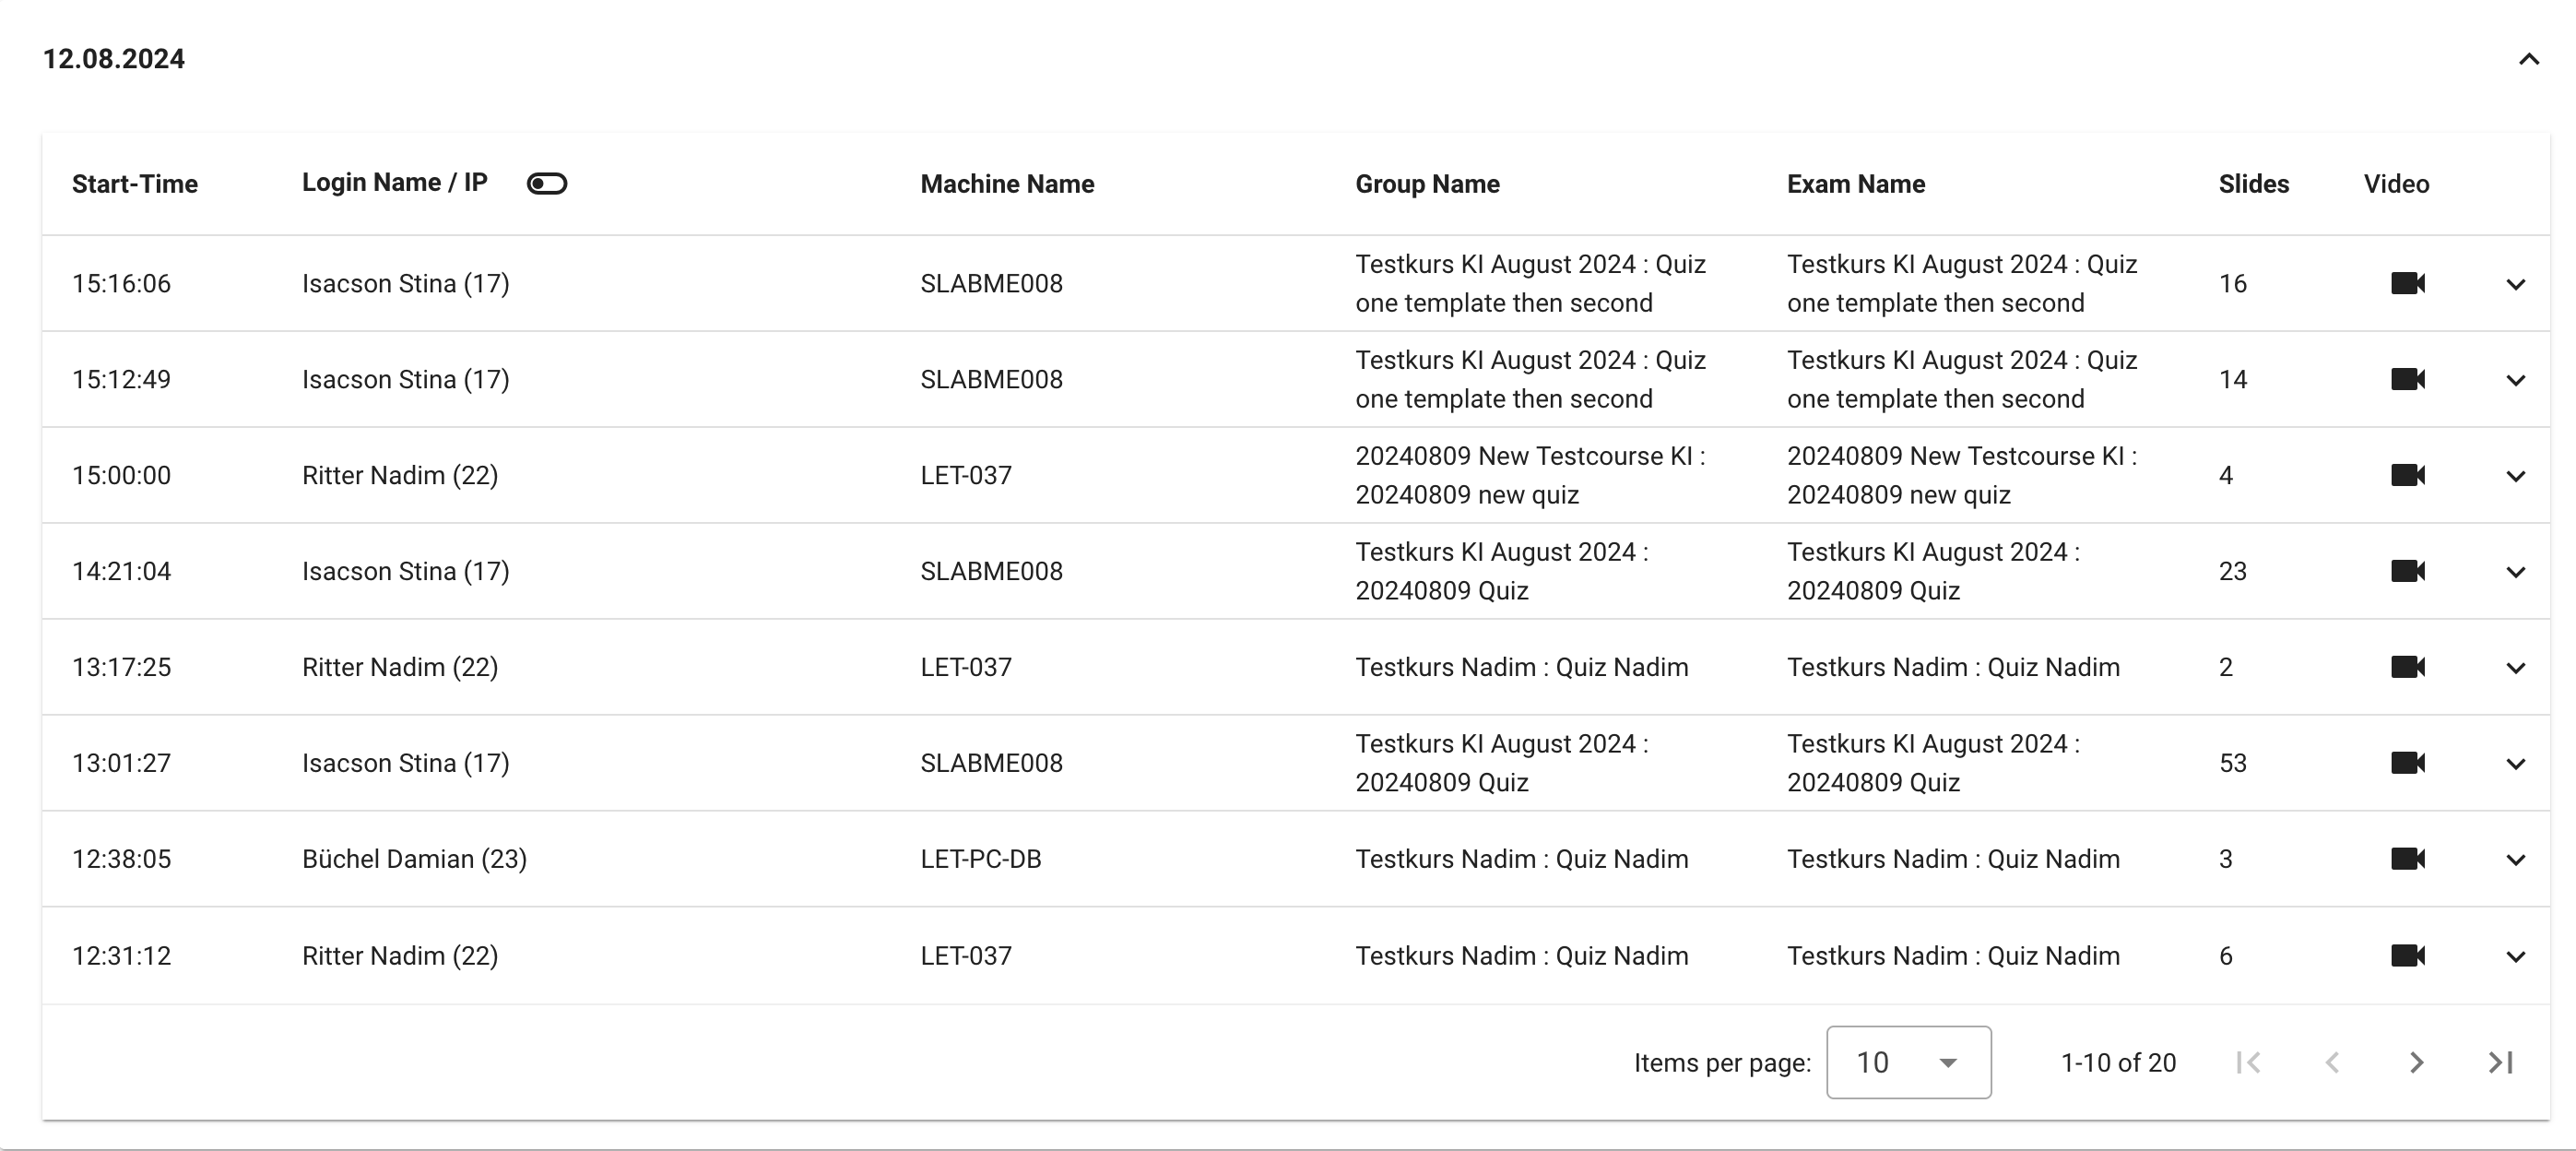
By default, the screenshot are sorted by “Capture-Time” in ascending order
The screenshots are grouped into the metadata “Application / Website”
Grouping means that each successive screenshot that has the same “Application / Website” metadata is placed in the same group
Click on the camera icon on the right side to open the proctoring view at this exact time
Note
If the session is still live the proctoring view won’t open at the given time but instead jumps to the latest image.
Applications Search
Since SEB Server 2.1 there is a new search in Screen Proctoring, for screenshots that relates to a certain application (Metadata) where you can search the screenshots of one ore more exams and get an application grouped search result per user that used the application
This search can be found in den Screen Proctoring under “Applications” within the left menu pane:
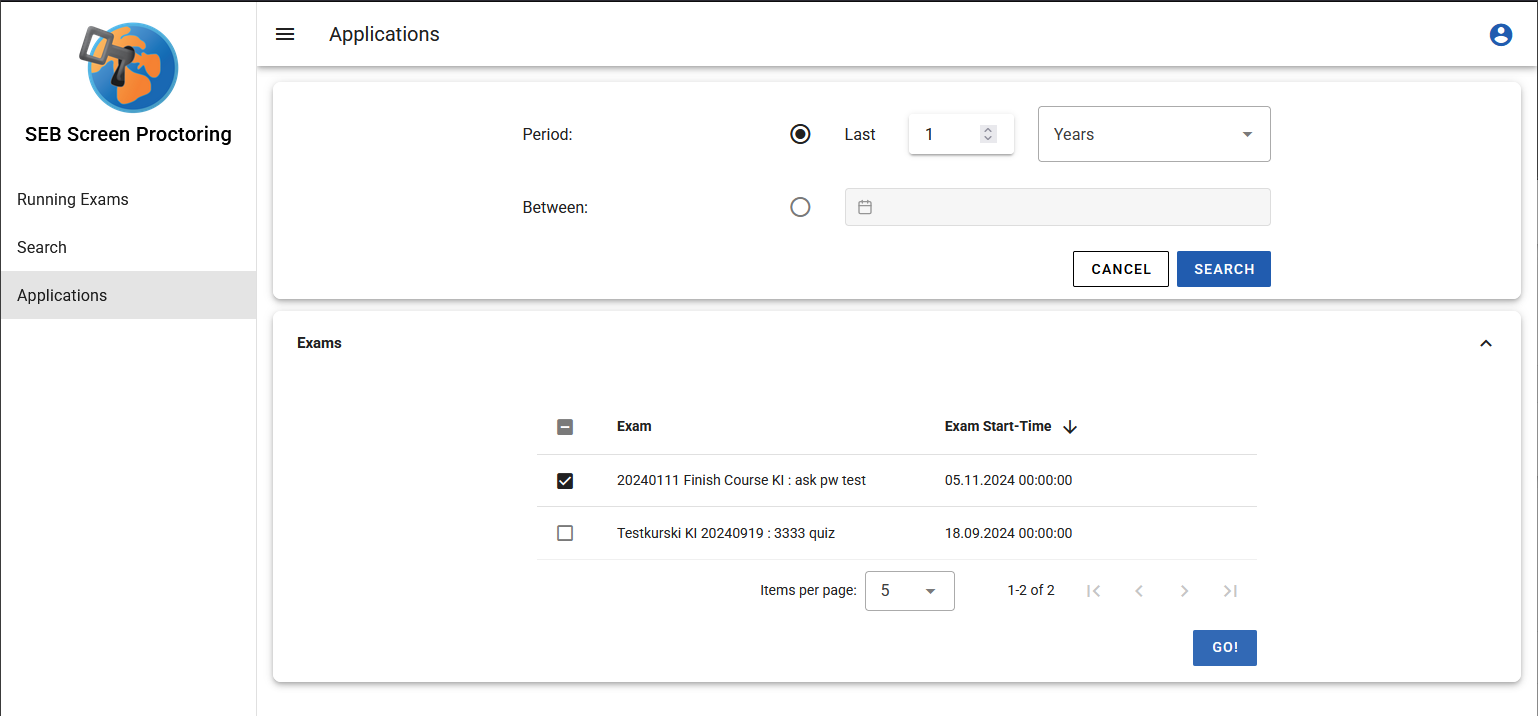
On the first step you can define a date / time frame for which the search shall apply and get a list of Exams that are within this time frame, after using the “Search” action. Within the list of exam you can select the Exams you are interested in or just select all Exams that has been found.
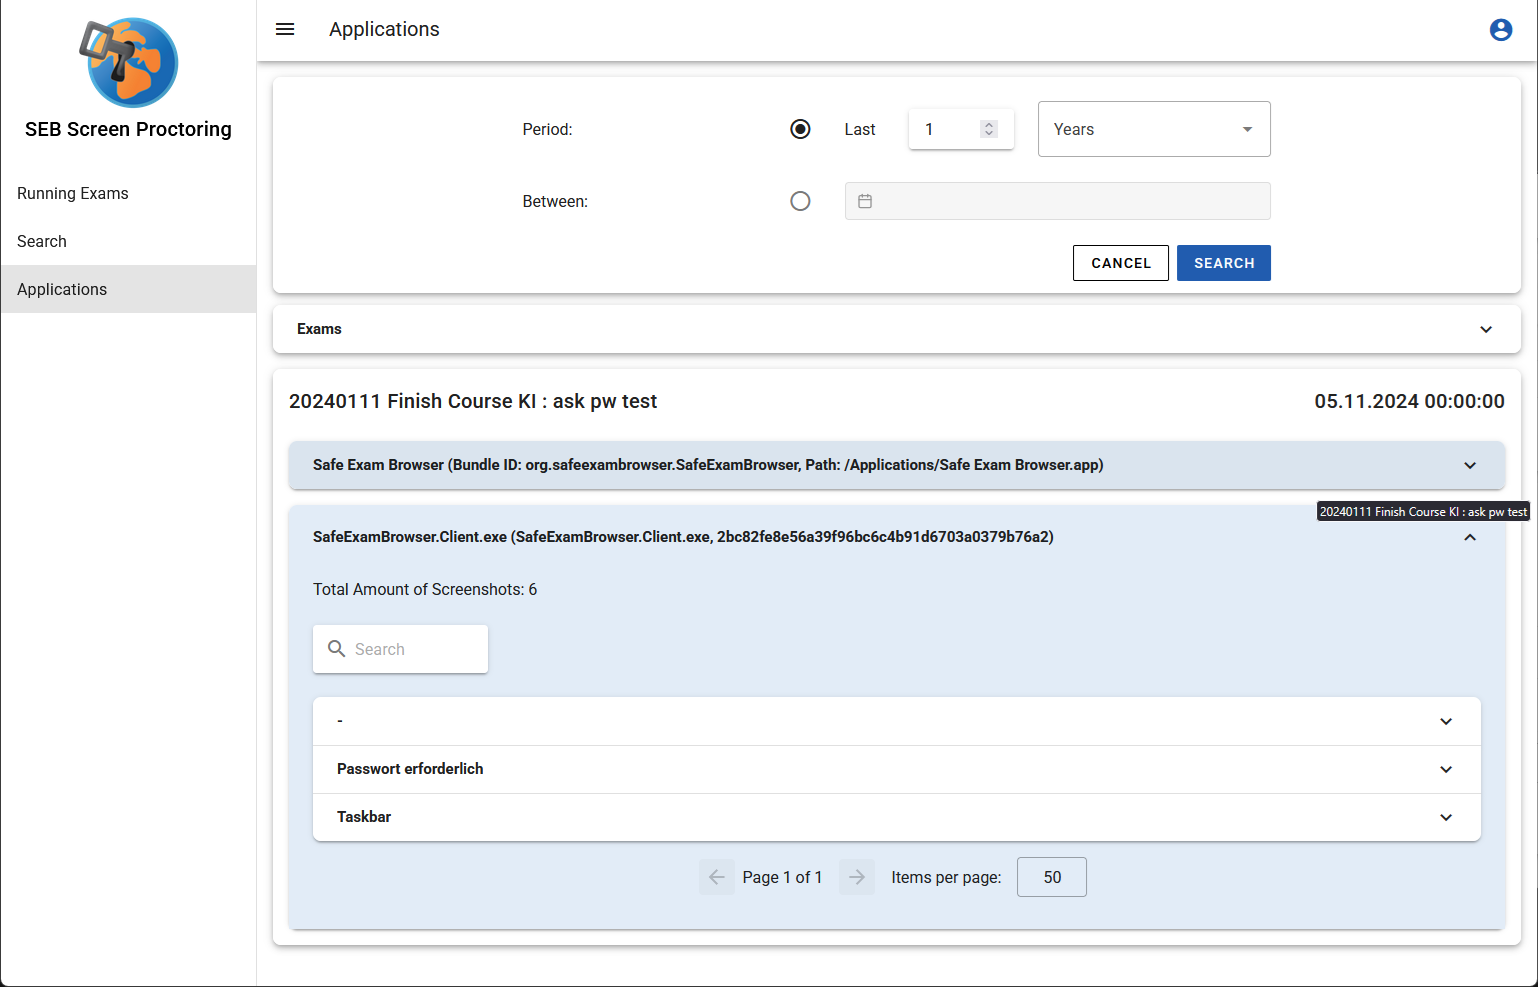
After using the “Go” action, the search will present the results for each selected exam. For each exam there is a list of Applications that has been used during the exam. If you open one such application tab, the result will display a list of all different tabs or windows that has been used within the specific application. The result also displays how many screenshots has been taken for the Application within this Exam in total:
If you open a specific window / tab result then a list of all users gets displayed that used that Application - Tab/Window during the exam. You also can see the total of screenshots made by a specific user for the Application - Tab/Window and within the specific exam.or
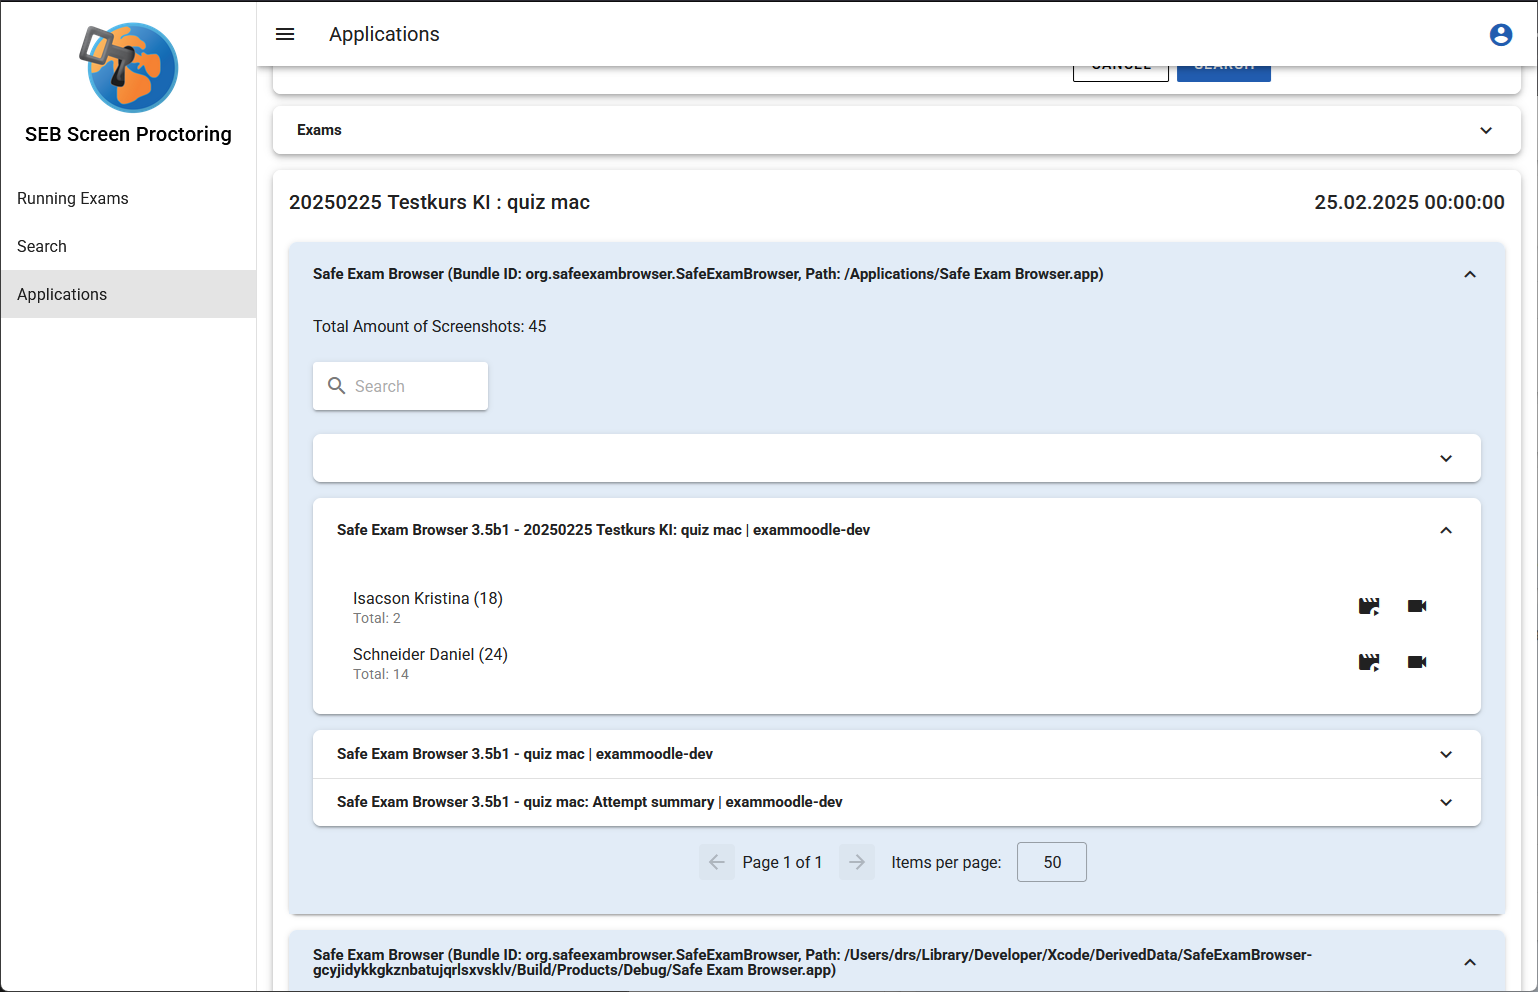
If you use the usual recording action item, the Screen Proctoring will open up a new tab with the whole recording of that user. But if you use the new recording folder action instead, the Screen Proctoring will open up a new tab with a recording that contains just the dedicated screenshots for the selected Application - Tab/Window.
Metadata
Metadata in context of the Screen Proctoring component are data which belong to a screenshot. They describe the content of the captured screen.
Currently the SEB-Client captures the following 5 metadata (additional values might follow in future releases):
- Focused Application: The name of the application that is currently in use and focused
e.g. “SafeExamBrowser.Client.exe”, “calc.exe”
- SEB-Browser-Title: The title of the SEB-Browser
e.g. “Exam Moodle 12”, “Moodle Exam Mathematics 3”
- Activity Details: The activity that triggered the screenshot
e.g. “A key has been pressed”, “Left mouse button has been pressed”
- SEB-Browser URL: The URL of the SEB-Browser
e.g. “http://google.com”, “http://moodle.com/exam123”
- Focused Window Title: The title of the focused window
e.g. “Google Homepage”, “Moodle Exam 123”, “Calculator”
Accessibility
SEB Screen Proctoring is accessible for people with disabilities in accordance with the international accessibility standards WCAG. Further information on the individual success criteria and conformance levels as well as information on limitations are outlined in the Voluntary Product Accessibility Template document (VPAT WCAG edition):